An einem Projekt mitarbeiten
You know what the different workflows are, and you should have a pretty good grasp of fundamental Git usage. In this section, you’ll learn about a few common patterns for contributing to a project.
Du kennst jetzt einige grundlegende Workflow Varianten, und du solltest ein gutes Verständnis im Umgang mit grundlegenden Git Befehlen haben. In diesem Abschnitt lernst du wie du an einem Projekt mitzuarbeiten kannst.
The main difficulty with describing this process is that there are a huge number of variations on how it’s done. Because Git is very flexible, people can and do work together many ways, and it’s problematic to describe how you should contribute to a project — every project is a bit different. Some of the variables involved are active contributor size, chosen workflow, your commit access, and possibly the external contribution method.
Diesen Prozeß zu beschreiben ist nicht leicht, weil es so viele Variationen gibt. Git ist so unheimlich flexibel, daß Leute auf vielen unterschiedlichen Wegen zusammenarbeiten können, und es ist problematisch, zu erklären, wie du arbeiten solltest, weil jedes Projekt ein bißchen anders ist. Zu den Variablen gehören: die Anzahl der aktiven Mitarbeiter, der Workflow des Projektes, deine Commit Rechte und möglicherweise eine vorgeschriebene, externe Methode, Änderungen einzureichen.
The first variable is active contributor size. How many users are actively contributing code to this project, and how often? In many instances, you’ll have two or three developers with a few commits a day, or possibly less for somewhat dormant projects. For really large companies or projects, the number of developers could be in the thousands, with dozens or even hundreds of patches coming in each day. This is important because with more and more developers, you run into more issues with making sure your code applies cleanly or can be easily merged. Changes you submit may be rendered obsolete or severely broken by work that is merged in while you were working or while your changes were waiting to be approved or applied. How can you keep your code consistently up to date and your patches valid?
Wie viele Mitarbeiter tragen aktive Code zum Projekt bei? Und wie oft? In vielen Fällen findest du zwei oder drei Entwickler, die täglich einige Commits anlegen, möglicherweise weniger in eher (xxx dormant xxx) Projekten. In wirklich großen Unternehmen oder Projekten können tausende Entwickler involviert sein und täglich dutzende oder sogar hunderte von Patches produzieren. Mit so vielen Mitarbeitern ist es aufwendiger, sicher zu stellen, daß Änderungen sauber mit der Codebase zusammengeführt werden können. Deine Änderungen könnten sich als überflüssig oder dysfunktional (xxx) erweisen, nachdem andere Änderungen übernommen wurden, seit du angefangen hast, an deinen eigenen zu arbeiten oder während sie darauf warteten, geprüft und eingefügt (xxx) zu werden.
The next variable is the workflow in use for the project. Is it centralized, with each developer having equal write access to the main codeline? Does the project have a maintainer or integration manager who checks all the patches? Are all the patches peer-reviewed and approved? Are you involved in that process? Is a lieutenant system in place, and do you have to submit your work to them first?
Die nächste Variable ist der Workflow, der in diesem Projekt besteht. Ist es ein zentralisierter Workflow, in dem jeder Entwickler Schreibzugriff auf die Hauptentwicklungslinie hat? Hat das Projekt einen Leiter oder Integration Manager, der alle Patches prüft? Werden die Patches durch eine bestimmte Gruppe oder öffentlich, z.B. durch die Community, geprüft? Nimmst du selbst an diesem Prozeß teil? Gibt es ein Leutnant System, in dem du deine Arbeit zunächst an einen Leutnant übergibst?
The next issue is your commit access. The workflow required in order to contribute to a project is much different if you have write access to the project than if you don’t. If you don’t have write access, how does the project prefer to accept contributed work? Does it even have a policy? How much work are you contributing at a time? How often do you contribute?
Eine weitere Frage ist, welche Commit Rechte du hast. Wenn du Schreibrechte hast, sieht der Arbeitsablauf, mit dem Du Änderungen beisteuern kannst, natürlich völlig anders aus, als wenn du nur Leserechte hast. Und in letzterem Fall: in welcher Form werden Änderungen in diesem Projekt akzeptiert? Gibt es dafür überhaupt eine Richtlinie? Wie umfangreich sind die Änderungen, die du jeweils beisteuerst? Und wie oft tust du das?
All these questions can affect how you contribute effectively to a project and what workflows are preferred or available to you. I’ll cover aspects of each of these in a series of use cases, moving from simple to more complex; you should be able to construct the specific workflows you need in practice from these examples.
Die Antworten auf diese Fragen können maßgeblich beeinflussen, wie du effektiv an einem Projekt mitarbeiten kannst und welche Workflows du zur Auswahl hast. Wir werden verschiedene Aspekte davon in einer Reihe von Fallbeispielen besprechen, wobei wir mit simplen Beispielen anfangen und später komplexere Szenarios besprechen. Du wirst hoffentlich in der Lage sein, aus diesen Beispielen einen eigenen Workflow zu konstruieren, der deinen Anforderungen entspricht.
Commit Guidelines
Commit Richtlinien
Before you start looking at the specific use cases, here’s a quick note about commit messages. Having a good guideline for creating commits and sticking to it makes working with Git and collaborating with others a lot easier. The Git project provides a document that lays out a number of good tips for creating commits from which to submit patches — you can read it in the Git source code in the Documentation/SubmittingPatches file.
Bevor wir uns verschiedene konkrete Fallbeispiele ansehen, einige kurze Anmerkungen über Commit Meldungen. Gute Richtlinien für Commit Meldungen zu haben und sich danach zu richten, macht die Zusammenarbeit mit anderen und die Arbeit mit Git selbst sehr viel einfacher. Im Git Projekt gibt es ein Dokument mit einer Reihe nützlicher Tipps für das Anlegen von Commits, aus denen man Patches erzeugen will. Schaue im Git Quellcode nach der Datei Documentation/SubmittingPatches.
First, you don’t want to submit any whitespace errors. Git provides an easy way to check for this — before you commit, run git diff --check, which identifies possible whitespace errors and lists them for you. Here is an example, where I’ve replaced a red terminal color with Xs:
Zunächst einmal solltest du keine Whitespace Fehler (xxx) comitten:
$ git diff --check
lib/simplegit.rb:5: trailing whitespace.
+    @git_dir = File.expand_path(git_dir)XX
lib/simplegit.rb:7: trailing whitespace.
+ XXXXXXXXXXX
lib/simplegit.rb:26: trailing whitespace.
+    def command(git_cmd)XXXX
If you run that command before committing, you can tell if you’re about to commit whitespace issues that may annoy other developers.
Wenn du diesen Befehl ausführst, bevor du einen Commit anlegst, warnt er dich, falls in deinen Änderungen Whitespace Probleme vorliegen, die andere Entwickler ärgern könnten.
Next, try to make each commit a logically separate changeset. If you can, try to make your changes digestible — don’t code for a whole weekend on five different issues and then submit them all as one massive commit on Monday. Even if you don’t commit during the weekend, use the staging area on Monday to split your work into at least one commit per issue, with a useful message per commit. If some of the changes modify the same file, try to use git add --patch to partially stage files (covered in detail in Chapter 6). The project snapshot at the tip of the branch is identical whether you do one commit or five, as long as all the changes are added at some point, so try to make things easier on your fellow developers when they have to review your changes. This approach also makes it easier to pull out or revert one of the changesets if you need to later. Chapter 6 describes a number of useful Git tricks for rewriting history and interactively staging files — use these tools to help craft a clean and understandable history.
Versuche außerdem, deine Änderungen in logisch zusammenhängende Einheiten zu gruppieren. Wenn möglich, versuche Commits möglichst leichtverständlich (xxx) zu gestalten: arbeite nicht ein ganzes Wochenende lang an fünf verschiedenen Problemen und committe sie dann am Montag als einen einzigen, riesigen Commit. Selbst wenn du am Wochenende keine Commits angelegt hast, verwende die Staging Area, um deine Änderungen auf mehrere Commits aufzuteilen, jeweils mit einer verständlichen Meldung. Wenn einige Änderungen dieselbe Datei betreffen, probiere sie mit git add --patch nur teilweise zur Staging Area hinzuzufügen (das werden wir in Kapitel 6 noch im Detail besprechen). Der Projekt Snapshot wird am Ende derselbe sein, ob du nun einen einzigen großen oder mehrere kleine Commits anlegst, daher versuche, es anderen Entwickler zu erleichtern machen, deine Änderungen zu verstehen. Auf diese Weise machst du es auch einfacher, einzelne Änderungen später herauszunehmen oder rückgängig zu machen. Kapitel 6 beschreibt eine Reihe nützlicher Git Tricks, die hilfreich sind, um die Historie umzuschreiben oder interaktiv Dateien zur Staging Area hinzuzufügen. Verwende diese Hilfsmittel, um eine sauber und leicht verständliche Historie von Änderungen aufzubauen.
The last thing to keep in mind is the commit message. Getting in the habit of creating quality commit messages makes using and collaborating with Git a lot easier. As a general rule, your messages should start with a single line that’s no more than about 50 characters and that describes the changeset concisely, followed by a blank line, followed by a more detailed explanation. The Git project requires that the more detailed explanation include your motivation for the change and contrast its implementation with previous behavior — this is a good guideline to follow. It’s also a good idea to use the imperative present tense in these messages. In other words, use commands. Instead of “I added tests for” or “Adding tests for,” use “Add tests for.” Here is a template originally written by Tim Pope at tpope.net:
Ein weitere Sache, der du ein bißchen Aufmerksamkeit schenken solltest, ist die Commit Meldung selbst. Wenn man sich angewöhnt, aussagekräftige und hochwertige Commit Meldungen zu schreiben, macht man sich selbst und anderen das Leben erheblich einfacher. Im allgemeinen sollte eine Commit Meldung mit einer einzelnen Zeile anfangen, die nicht länger als 50 Zeichen sein sollte. Dann sollte eine leere Zeile folgen und schließlich eine ausführlichere Beschreibung der Änderungen.
Short (50 chars or less) summary of changes

Kurze Zusammenfassung in weniger als 50 Zeichen

More detailed explanatory text, if necessary.  Wrap it to about 72
characters or so.  In some contexts, the first line is treated as the
subject of an email and the rest of the text as the body.  The blank
line separating the summary from the body is critical (unless you omit
the body entirely); tools like rebase can get confused if you run the
two together.

Ausführlichere Beschreibung, falls nötig. Sollte bei etwa 72 Zeichen
umgebrochen werden. Manchmal wird die erste Zeile als Betreff einer
E-Mail verwendet und die Beschreibung als Text der E-Mail. Die leere
Zeile, die die ausführliche Beschreibung von der zusammenfassenden
ersten Zeile trennt, ist wichtig (sofern du eine Beschreibung hast).
Befehle wie `rebase` können andernfalls Probleme produzieren. (xxx what?)

Further paragraphs come after blank lines.

Weitere Absätze nach leeren Zeilen.

 - Bullet points are okay, too

 - Du kannst Bullet Points (xxx) verwenden.

 - Typically a hyphen or asterisk is used for the bullet, preceded by a
   single space, with blank lines in between, but conventions vary here

 - Normalerweise werden ein Bindestrich oder Stern als Bullet Point
   verwendet, jeweils mit einem einzelnen Leerzeichen davor und leeren
   Zeilen dazwischen, aber hier gibt es verschiedene Konventionen.
If all your commit messages look like this, things will be a lot easier for you and the developers you work with. The Git project has well-formatted commit messages — I encourage you to run git log --no-merges there to see what a nicely formatted project-commit history looks like.
Wenn du deine Commit Meldungen in dieser Weise formatierst, kannst du dir und anderen eine Menge Ärger ersparen. Das Git Projekt selbst hat wohl-formatierte Commit Meldungen. Wir empfehlen, einmal git log --no-merges in diesem Repository auszuführen, um einen Eindruck zu erhalten, wie eine gute Commit History eines Projektes aussehen kann.
In the following examples, and throughout most of this book, for the sake of brevity I don’t format messages nicely like this; instead, I use the -m option to git commit. Do as I say, not as I do.
In den folgenden Beispielen hier und fast überall in diesem Buch verwende ich keine derartigen, schön formatierten Meldungen. Stattdessen verwende ich die -m Option zusammen mit git commit. Also folge meinen Worten, nicht meinem Beispiel.
Private Small Team
Kleine Teams
The simplest setup you’re likely to encounter is a private project with one or two other developers. By private, I mean closed source — not read-accessible to the outside world. You and the other developers all have push access to the repository.
Das einfachste Setup, mit dem du zu tun haben wirst, ist ein privates Projekt mit ein oder zwei Entwicklern. Mit “privat” meine ich, daß es “closed source”, d.h. nicht lesbar für Dritte ist. Alle beteiligten Entwickler haben Schreibzugriff auf das Repository.
In this environment, you can follow a workflow similar to what you might do when using Subversion or another centralized system. You still get the advantages of things like offline committing and vastly simpler branching and merging, but the workflow can be very similar; the main difference is that merges happen client-side rather than on the server at commit time. Let’s see what it might look like when two developers start to work together with a shared repository. The first developer, John, clones the repository, makes a change, and commits locally. (I’m replacing the protocol messages with ... in these examples to shorten them somewhat.)
In einer solchen Umgebung kann man einen ähnlichen Workflow verwenden, wie für Subversion oder ein anderes zentralisiertes System. Du hast dann immer noch Vorteile wie, daß du offline committen kannst und daß Branching und Merging so unglaublich einfach ist. Der Hauptunterschied ist, daß Merges auf der Client Seite stattfinden und nicht, wenn man committet, auf dem Server. Schauen wir uns an, wie die Arbeit von zwei Entwicklern in einem gemeinsamen Repository abläuft. Der erste Entwickler, John, klont das Repository, nimmt eine Änderung vor und comittet auf seinem Rechner. (Wir kürzen die Beispiele etwas ab und ersetzen die hierfür irrelevanten Protokoll Meldungen mit xxx.)
# John's Machine
$ git clone john@githost:simplegit.git
Initialized empty Git repository in /home/john/simplegit/.git/
...
$ cd simplegit/
$ vim lib/simplegit.rb
$ git commit -am 'removed invalid default value'
[master 738ee87] removed invalid default value
 1 files changed, 1 insertions(+), 1 deletions(-)
The second developer, Jessica, does the same thing — clones the repository and commits a change:
Der zweite Entwickler, Jessica, tut das gleiche. Sie klont das Repository und committet eine Änderung:
# Jessica's Machine
$ git clone jessica@githost:simplegit.git
Initialized empty Git repository in /home/jessica/simplegit/.git/
...
$ cd simplegit/
$ vim TODO
$ git commit -am 'add reset task'
[master fbff5bc] add reset task
 1 files changed, 1 insertions(+), 0 deletions(-)
Now, Jessica pushes her work up to the server:
Jetzt lädt Jessica ihre Arbeit mit git push auf den Server:
# Jessica's Machine
$ git push origin master
...
To jessica@githost:simplegit.git
   1edee6b..fbff5bc  master -> master
John tries to push his change up, too:
John versucht, das selbe zu tun:
# John's Machine
$ git push origin master
To john@githost:simplegit.git
 ! [rejected]        master -> master (non-fast forward)
error: failed to push some refs to 'john@githost:simplegit.git'
John isn’t allowed to push because Jessica has pushed in the meantime. This is especially important to understand if you’re used to Subversion, because you’ll notice that the two developers didn’t edit the same file. Although Subversion automatically does such a merge on the server if different files are edited, in Git you must merge the commits locally. John has to fetch Jessica’s changes and merge them in before he will be allowed to push:
John darf seine Änderung nicht pushen, weil Jessica in der Zwischenzeit gepushed hat. Dies ist ein Unterschied zu Subversion: wie du siehst, haben die beiden Entwickler nicht dieselbe Datei bearbeitet. Während Subversion automatisch merged, wenn lediglich verschiedene Dateien bearbeitet wurden, muß man Commits in Git lokal mergen. John muß also Jessicas Änderungen herunter landen und mergen, bevor er dann selbst pushen darf:
$ git fetch origin
...
From john@githost:simplegit
 + 049d078...fbff5bc master     -> origin/master
At this point, John’s local repository looks something like Figure 5-4.
Zu diesem Zeitpunkt sieht Johns lokales Repository jetzt aus wie in Bild 5-4.
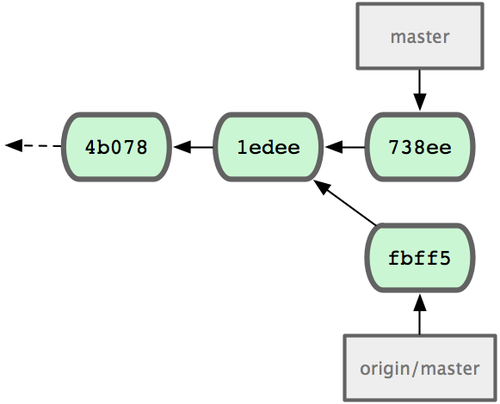
Figure 5-4. John’s initial repository
Bild 5-4. Johns ursprüngliches Repository
John has a reference to the changes Jessica pushed up, but he has to merge them into his own work before he is allowed to push:
John hat eine Referenz auf Jessicas Änderungen, aber er muß sie mit seinen eigenen Änderungen mergen, bevor er auf den Server pushen darf:
$ git merge origin/master
Merge made by recursive.
 TODO |    1 +
 1 files changed, 1 insertions(+), 0 deletions(-)
The merge goes smoothly — John’s commit history now looks like Figure 5-5.
Der Merge verläuft glatt: Johns Commit Historie sieht jetzt aus wie in Bild 5-5.
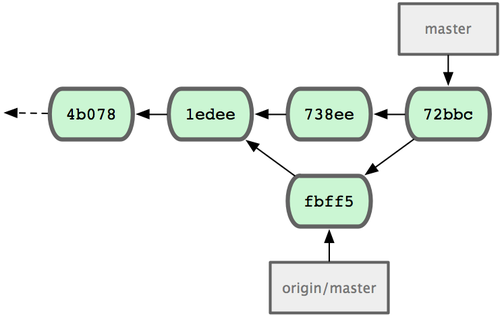
Figure 5-5. John’s repository after merging origin/master
Johns Repository nach dem Merge mit origin/master
Now, John can test his code to make sure it still works properly, and then he can push his new merged work up to the server:
John sollte seinen Code jetzt testen, um sicher zu stellen, daß alles weiterhin funktioniert. Dann kann er seine Arbeit auf den Server pushen:
$ git push origin master
...
To john@githost:simplegit.git
   fbff5bc..72bbc59  master -> master
Finally, John’s commit history looks like Figure 5-6.
Johns Commit Historie sieht schließlich aus wie in Bild 5-6.
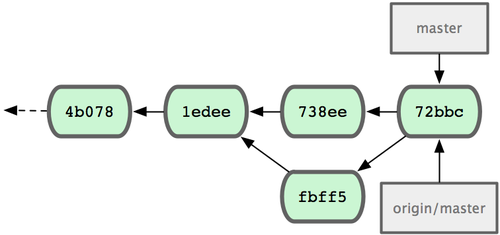
Figure 5-6. John’s history after pushing to the origin server
Johns Commit Historie nach dem pushen auf den origin Server
In the meantime, Jessica has been working on a topic branch. She’s created a topic branch called issue54 and done three commits on that branch. She hasn’t fetched John’s changes yet, so her commit history looks like Figure 5-7.
In der Zwischenzeit hat Jessica auf einem Topic Branch (xxx) gearbeitet. Sie hat einen Topic Branch mit dem Namen issue54 und darin drei Commits angelegt. Sie hat Johns Änderungen bisher noch nicht herunter geladen, so daß ihre Commit Historie jetzt so aussieht wie in Bild 5-7.

Figure 5-7. Jessica’s initial commit history
Bild 5-7. Jessicas ursprüngliche Commit Historie
Jessica wants to sync up with John, so she fetches:
Jessica will ihre Arbeit jetzt mit John synchronisieren. Also lädt sie seine Änderungen herunter:
# Jessica's Machine
$ git fetch origin
...
From jessica@githost:simplegit
   fbff5bc..72bbc59  master     -> origin/master
That pulls down the work John has pushed up in the meantime. Jessica’s history now looks like Figure 5-8.
Das lädt die Änderungen, die John in der Zwischenzeit hochgeladen hat. Jessicas Historie entspricht jetzt Bild 5-8.
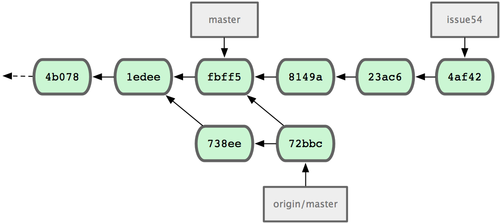
Figure 5-8. Jessica’s history after fetching John’s changes
Bild 5-8. Jessicas Historie nachdem sie Johns Änderungen geladen hat
Jessica thinks her topic branch is ready, but she wants to know what she has to merge her work into so that she can push. She runs git log to find out:
Jessica hat die Arbeit in ihrem Topic Branch abgeschlossen, aber sie will wissen, welche neuen Änderungen es gibt, mit denen sie ihre eigenen mergen muß.
$ git log --no-merges origin/master ^issue54
commit 738ee872852dfaa9d6634e0dea7a324040193016
Author: John Smith <jsmith@example.com>
Date:   Fri May 29 16:01:27 2009 -0700

    removed invalid default value

		ungültigen Default Wert entfernt
Now, Jessica can merge her topic work into her master branch, merge John’s work (origin/master) into her master branch, and then push back to the server again. First, she switches back to her master branch to integrate all this work:
Jetzt kann Jessica zunächst ihren Topic Branch issue54 in ihren master Branch mergen, dann Johns Änderungen aus origin/master in ihren master Branch mergen und schließlich das Resultat auf den origin Server pushen. Als erstes wechselt sie zurück auf ihren master Branch:
$ git checkout master
Switched to branch "master"
Your branch is behind 'origin/master' by 2 commits, and can be fast-forwarded.
She can merge either origin/master or issue54 first — they’re both upstream, so the order doesn’t matter. The end snapshot should be identical no matter which order she chooses; only the history will be slightly different. She chooses to merge in issue54 first:
Sie kann jetzt entweder origin/master oder issue54 zuerst mergen - sie sind beide “upstream” (xxx). Der resultierende Snapshot wäre identisch, egal in welcher Reihenfolge sie beide Branches in ihren master Branch merged, lediglich die Historie würde natürlich minimal anders aussehen. Jessica entscheidet sich, issue54 zuerst zu mergen:
$ git merge issue54
Updating fbff5bc..4af4298
Fast forward
 README           |    1 +
 lib/simplegit.rb |    6 +++++-
 2 files changed, 6 insertions(+), 1 deletions(-)
No problems occur; as you can see it, was a simple fast-forward. Now Jessica merges in John’s work (origin/master):
Das ging glatt, wie du siehst, war es ein einfacher “fast-forward” Merge. Als nächstes merged Jessica Johns Änderungen aus origin/master:
$ git merge origin/master
Auto-merging lib/simplegit.rb
Merge made by recursive.
 lib/simplegit.rb |    2 +-
 1 files changed, 1 insertions(+), 1 deletions(-)
Everything merges cleanly, and Jessica’s history looks like Figure 5-9.
Auch hier treten keine Konflikte auf. Jessicas Historie sieht jetzt wie folgt aus (Bild 5-9).
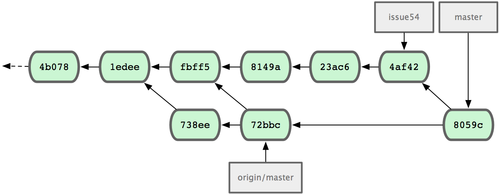
Figure 5-9. Jessica’s history after merging John’s changes
Bild 5-9. Jessicas Historie nach dem Merge mit Johns Änderungen
Now origin/master is reachable from Jessica’s master branch, so she should be able to successfully push (assuming John hasn’t pushed again in the meantime):
origin/master ist jetzt in Jessicas master Branch enthalten (xxx reachable xxx), so daß sie in der Lage sein sollte, auf den origin Server zu pushen (vorausgesetzt, John hat zwischenzeitlich nicht gepusht):
$ git push origin master
...
To jessica@githost:simplegit.git
   72bbc59..8059c15  master -> master
Each developer has committed a few times and merged each other’s work successfully; see Figure 5-10.
Beide Entwickler haben jetzt einige Male committed und die Arbeit des jeweils anderen erfolgreich mit ihrer eigenen zusammengeführt.
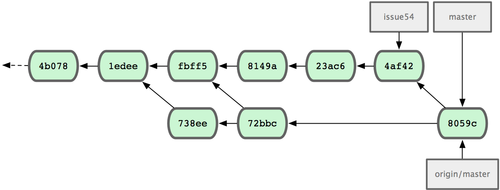
Figure 5-10. Jessica’s history after pushing all changes back to the server
Bild 5-10. Jessicas Historie nachdem sie sämtliche Änderungen auf den Server gepusht hat
That is one of the simplest workflows. You work for a while, generally in a topic branch, and merge into your master branch when it’s ready to be integrated. When you want to share that work, you merge it into your own master branch, then fetch and merge origin/master if it has changed, and finally push to the master branch on the server. The general sequence is something like that shown in Figure 5-11.
Dies ist eine der simpelsten Workflow Varianten. Du arbeitest eine Weile, normalerweise in einem Topic Branch, und mergst in deinen master Branch, wenn du fertig bist. Wenn du deine Änderungen anderen zur Verfügung stellen willst, holst du den aktuellen origin/master Branch, mergst deinen master Branch damit und pushst das ganze zurück auf den origin Server. Der Ablauf sieht in etwa wie folgt aus (Bild 5-11).
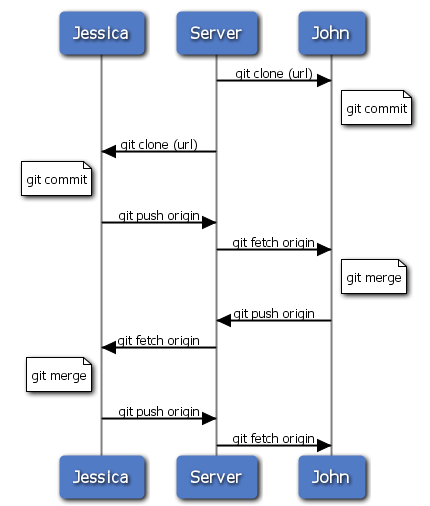
Figure 5-11. General sequence of events for a simple multiple-developer Git workflow
Bild 5-11. Ablauf eines einfachen Workflows für mehrere Entwickler
Private Managed Team
Teil-Teams mit Integration Manager
In this next scenario, you’ll look at contributor roles in a larger private group. You’ll learn how to work in an environment where small groups collaborate on features and then those team-based contributions are integrated by another party.
Im folgenden Szenario sehen wir uns die Rollen von Mitarbeitern in einem größeren, nicht öffentlich arbeitenden Team an. Du wirst sehen, wie man in einer Umgebung arbeiten kann, in der kleine Gruppen (z.B. an einzelnen Features) zusammenarbeiten und ihre Ergebnisse dann von einer weiteren Gruppe in die Hauptentwicklungslinie integriert werden.
Let’s say that John and Jessica are working together on one feature, while Jessica and Josie are working on a second. In this case, the company is using a type of integration-manager workflow where the work of the individual groups is integrated only by certain engineers, and the master branch of the main repo can be updated only by those engineers. In this scenario, all work is done in team-based branches and pulled together by the integrators later.
Sagen wir John und Jessica arbeiten gemeinsam an einem Feature, während Jessica und Josie an einem anderen arbeiten. Das Unternehmen verwendet einen Integration-Manager Workflow, in dem die Arbeit der verschiedenen Gruppen von anderen Mitarbeitern zentral integriert werden - und der master Branch nur von diesen letzteren geschrieben werden kann. In diesem Szenario wird sämtliche Arbeit von den Teams in Branches erledigt und dann von den Integration-Manangern zusammengeführt.
Let’s follow Jessica’s workflow as she works on her two features, collaborating in parallel with two different developers in this environment. Assuming she already has her repository cloned, she decides to work on featureA first. She creates a new branch for the feature and does some work on it there:
Schauen wir uns Jessicas Workflow an, während sie mit jeweils verschiedenen Entwicklern parallel an zwei Features arbeitet. Nehmen wir an, sie hat das Repository bereits geklont und will zuerst an featureA arbeiten. Sie legt einen neuen Branch für das Feature an und fängt an, daran zu arbeiten:
# Jessica's Machine
$ git checkout -b featureA
Switched to a new branch "featureA"
$ vim lib/simplegit.rb
$ git commit -am 'add limit to log function'
[featureA 3300904] add limit to log function
 1 files changed, 1 insertions(+), 1 deletions(-)
At this point, she needs to share her work with John, so she pushes her featureA branch commits up to the server. Jessica doesn’t have push access to the master branch — only the integrators do — so she has to push to another branch in order to collaborate with John:
Jetzt will sie ihre Arbeit John zur Verfügung stellen, der am gleichen Feature arbeiten will, und pusht dazu ihre Commits in ihrem featureA Branch auf den Server. Jessica hat keinen Schreibzugriff auf den master Branch - den haben nur die Integration Manager - also pusht sie ihren Feature Branch, der nur der Zusammenarbeit mit John dient:
$ git push origin featureA
...
To jessica@githost:simplegit.git
 * [new branch]      featureA -> featureA
Jessica e-mails John to tell him that she’s pushed some work into a branch named featureA and he can look at it now. While she waits for feedback from John, Jessica decides to start working on featureB with Josie. To begin, she starts a new feature branch, basing it off the server’s master branch:
Jessica schickt John eine E-Mail und läßt ihn wissen, daß sie ihre Arbeit in einen Branch featureA hochgeladen hat. Während sie jetzt auf Feedback von John wartet, kann Jessica anfangen, an featureB zuarbeiten - diesmal gemeinsam mit Josie. Also legt sie einen neuen Feature Branch an, der auf dem gegenwärtigen master Branch des origin Servers basiert:
# Jessica's Machine
$ git fetch origin
$ git checkout -b featureB origin/master
Switched to a new branch "featureB"
Now, Jessica makes a couple of commits on the featureB branch:
Jetzt legt Jessica eine Reihe von Commits im featureB Branch an:
$ vim lib/simplegit.rb
$ git commit -am 'made the ls-tree function recursive'
[featureB e5b0fdc] made the ls-tree function recursive
 1 files changed, 1 insertions(+), 1 deletions(-)
$ vim lib/simplegit.rb
$ git commit -am 'add ls-files'
[featureB 8512791] add ls-files
 1 files changed, 5 insertions(+), 0 deletions(-)
Jessica’s repository looks like Figure 5-12.
Jessicas Repository entspricht jetzt Bild 5-12.
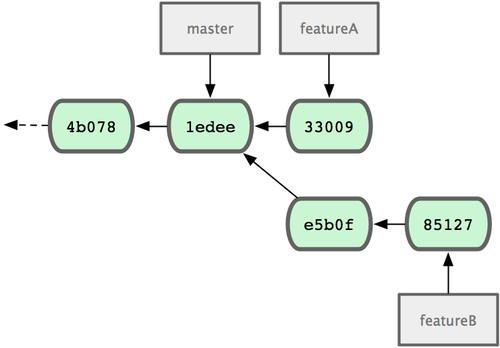
Figure 5-12. Jessica’s initial commit history
Bild 5-12. Jessicas ursprüngliche Commit Historie
She’s ready to push up her work, but gets an e-mail from Josie that a branch with some initial work on it was already pushed to the server as featureBee. Jessica first needs to merge those changes in with her own before she can push to the server. She can then fetch Josie’s changes down with git fetch:
Jessica könnte ihre Arbeit jetzt hochladen, aber sie hat eine E-Mail von Josie erhalten, daß sie bereits einen Feature Branch featureBee für dasselbe Feature auf dem Server angelegt hat. Jessica muß also erst ihre eigenen Änderungen mit diesem Branch mergen und dann dorthin pushen. Sie lädt also Josies Änderungen mit git fetch herunter:
$ git fetch origin
...
From jessica@githost:simplegit
 * [new branch]      featureBee -> origin/featureBee
Jessica can now merge this into the work she did with git merge:
Jessica kann ihre eigene Arbeit jetzt mit diesen Änderungen zusammenführen:
$ git merge origin/featureBee
Auto-merging lib/simplegit.rb
Merge made by recursive.
 lib/simplegit.rb |    4 ++++
 1 files changed, 4 insertions(+), 0 deletions(-)
There is a bit of a problem — she needs to push the merged work in her featureB branch to the featureBee branch on the server. She can do so by specifying the local branch followed by a colon (:) followed by the remote branch to the git push command:
Es gibt jetzt ein kleines Problem. Jessica muß die zusammengeführten Änderungen in ihrem featureB Branch in den featureBee Branch auf dem Server pushen. Das kann sie tun, indem sie sowohl den Namen ihres lokalen Branches als auch des externen Branches angibt, und zwar mit einem Doppelpunkt getrennt:
$ git push origin featureB:featureBee
...
To jessica@githost:simplegit.git
   fba9af8..cd685d1  featureB -> featureBee
This is called a refspec. See Chapter 9 for a more detailed discussion of Git refspecs and different things you can do with them.
Das nennt man eine Refspec. In Kapitel 9 gehen wir detailliert auf Git Refspecs ein und darauf, was man noch mit ihnen machen kann.
Next, John e-mails Jessica to say he’s pushed some changes to the featureA branch and ask her to verify them. She runs a git fetch to pull down those changes:
Als nächstes schickt John Jessica eine E-Mail. Er schreibt, daß er einige Änderungen in den featureA Branch gepusht hat, und bittet sie, diese zu prüfen. Sie führt also git fetch aus, um die Änderungen herunter zu laden:
$ git fetch origin
...
From jessica@githost:simplegit
   3300904..aad881d  featureA   -> origin/featureA
Then, she can see what has been changed with git log:
Danach kann sie die neuen Änderungen mit git log auflisten:
$ git log origin/featureA ^featureA
commit aad881d154acdaeb2b6b18ea0e827ed8a6d671e6
Author: John Smith <jsmith@example.com>
Date:   Fri May 29 19:57:33 2009 -0700

    changed log output to 30 from 25
Finally, she merges John’s work into her own featureA branch:
Schließlich aktualisiert sie ihren eigenen featureA Branch mit Johns Änderungen:
$ git checkout featureA
Switched to branch "featureA"
$ git merge origin/featureA
Updating 3300904..aad881d
Fast forward
 lib/simplegit.rb |   10 +++++++++-
1 files changed, 9 insertions(+), 1 deletions(-)
Jessica wants to tweak something, so she commits again and then pushes this back up to the server:
Jessica will eine kleine Änderung vornehmen. Also comittet sie und pusht den neuen Commit auf den Server:
$ git commit -am 'small tweak'
[featureA ed774b3] small tweak
 1 files changed, 1 insertions(+), 1 deletions(-)
$ git push origin featureA
...
To jessica@githost:simplegit.git
   3300904..ed774b3  featureA -> featureA
Jessica’s commit history now looks something like Figure 5-13.
Jessicas Commit Historie sieht jetzt wie folgt aus (Bild 5-13).
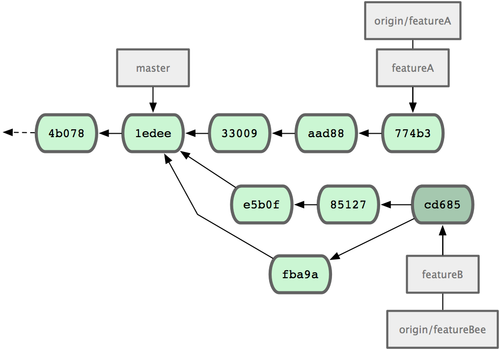
Figure 5-13. Jessica’s history after committing on a feature branch
Bild 5-13. Jessicas Historie mit dem neuen Commit im Feature Branch
Jessica, Josie, and John inform the integrators that the featureA and featureBee branches on the server are ready for integration into the mainline. After they integrate these branches into the mainline, a fetch will bring down the new merge commits, making the commit history look like Figure 5-14.
Jessica, Josie und John informieren jetzt ihre Integration Manager, daß die Ändeurngen in den Branches featureA und featureBee fertig sind und in die Hauptlinie in master übernommen werden können. Nachdem das geschehen ist, wird git fetch die neuen Merge Commits herunter laden und die Commit Historie in etwa wie folgt aussehen (Bild 5-14):
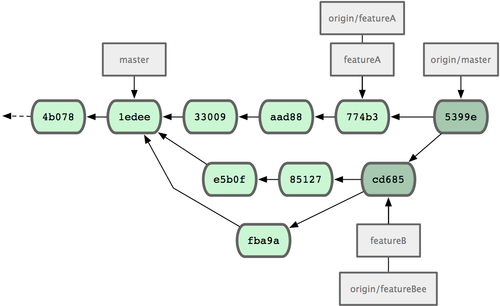
Figure 5-14. Jessica’s history after merging both her topic branches
Bild 5-14. Jessicas Historie nachdem beide Feature Branches gemerged wurden
Many groups switch to Git because of this ability to have multiple teams working in parallel, merging the different lines of work late in the process. The ability of smaller subgroups of a team to collaborate via remote branches without necessarily having to involve or impede the entire team is a huge benefit of Git. The sequence for the workflow you saw here is something like Figure 5-15.
Viele Teams wechseln zu Git, weil es auf einfache Weise ermöglicht, verschiedene Teams parallel an verschiedenen Entwicklungslinien zu arbeiten, die erst später im Prozeß integriert werden. Ein riesiger Vorteil von Git besteht darin, daß man in kleinen Teilgruppen über externe Branches zusammenarbeiten kann, ohne daß dazu notwendig wäre, das gesamte Team zu involvieren und möglicherweise aufzuhalten. Der Ablauf dieser Art von Workflow kann wie folgt dargestellt werden (Bild 5-15).
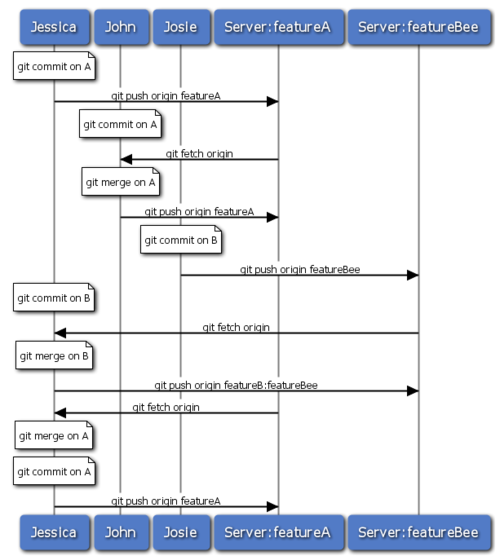
Figure 5-15. Basic sequence of this managed-team workflow
Bild 5-15. Workflow mit Teil-Teams und Integration Manager
Public Small Project
Kleine, öffentliche Projekte
Contributing to public projects is a bit different. Because you don’t have the permissions to directly update branches on the project, you have to get the work to the maintainers some other way. This first example describes contributing via forking on Git hosts that support easy forking. The repo.or.cz and GitHub hosting sites both support this, and many project maintainers expect this style of contribution. The next section deals with projects that prefer to accept contributed patches via e-mail.
An öffentlichen Projekten mitzuarbeiten funktioniert ein bißchen anders. Weil man normalerweise keinen Schreibzugriff auf das öffentliche Repository des Projektes hat, muß man mit den Betreibern in anderer Form zusammenarbeiten. Unser erstes Beispiel beschreibt, wie man zu Projekten auf Git Hosts beitragen kann, die es erlauben Forks eines Projektes anzulegen. Z.B. unterstützen die Git Hosting Seiten repo.or.cz und GitHub dieses Feature - und viele Projekt Betreiber akzeptieren Änderungen in dieser Form. Das nächste Beispiel geht dann darauf ein, wie man mit Projekten arbeiten kann, die es bevorzugen, Patches per E-Mail zu erhalten (xxx oder Ticket Tracker, wie z.B. Rails xxx).
First, you’ll probably want to clone the main repository, create a topic branch for the patch or patch series you’re planning to contribute, and do your work there. The sequence looks basically like this:
Zunächst wirst vermutlich das Hauptrepository klonen, einen Topic Branch für deinen Patch anlegen und dann darin arbeiten. Der Prozeß sieht dann in etwa so aus:
$ git clone (url)
$ cd project
$ git checkout -b featureA
$ (work)
$ git commit
$ (work)
$ git commit
You may want to use rebase -i to squash your work down to a single commit, or rearrange the work in the commits to make the patch easier for the maintainer to review — see Chapter 6 for more information about interactive rebasing.
Es ist wahrscheinlich sinnvoll, git rebase -i zu verwenden, um die verschiedenen Commits zu einem einzigen zusammen zu packen (“squash”, quetschen) oder um sie in anderer Weise neu zu arrangieren, so daß es für die Projekt Betreiber leichter ist, die Änderungen nach zu vollziehen. In Kapitel 6 gehen wir ausführlicher auf das interaktive rebase -i ein.
When your branch work is finished and you’re ready to contribute it back to the maintainers, go to the original project page and click the “Fork” button, creating your own writable fork of the project. You then need to add in this new repository URL as a second remote, in this case named myfork:
Wenn dein Branch fertig ist und du deine Arbeit den Projekt Betreibern zur Verfügung stellen willst, gehst du auf die Projekt Seite und klickst auf den “Fork” Button. Dadurch legst du deinen eigenen Fork des Projektes an, in den du dann schreiben kannst. Die Repository URL dieses Forks mußt du dann als ein zweites, externes Repository (“remote”) einrichten. In unserem Beispiel verwenden wir den Namen myfork:
$ git remote add myfork (url)You need to push your work up to it. It’s easiest to push the remote branch you’re working on up to your repository, rather than merging into your master branch and pushing that up. The reason is that if the work isn’t accepted or is cherry picked, you don’t have to rewind your master branch. If the maintainers merge, rebase, or cherry-pick your work, you’ll eventually get it back via pulling from their repository anyhow:
Jetzt kannst du deine Änderungen dorthin hochladen. Am besten tust du das, indem du deinen Topic Branch hochlädst (statt ihn in deinen master Branch zu mergen und den dann hochzuladen). Dies deshalb, weil du, wenn deine Änderungen nicht akzeptiert werden, deinen eigenen master Branch nicht zurücksetzen mußt. Wenn die Projekt Betreiber deine Änderungen mergen, rebasen oder cherry-picken, landen sie schließlich ohnehin in deinem master Branch.
$ git push myfork featureAWhen your work has been pushed up to your fork, you need to notify the maintainer. This is often called a pull request, and you can either generate it via the website — GitHub has a “pull request” button that automatically messages the maintainer — or run the git request-pull command and e-mail the output to the project maintainer manually.
Nachdem du deine Arbeit in deinen Fork hochgeladen hast, mußt du die Projekt Betreiber benachrichtigen. Dies wird oft als “pull request” bezeichnet. Du kannst ihn entweder direkt über die Webseite schicken (GitHub hat dazu einen “pull request” Button) oder den Git Befehl git request-pull verwenden und manuell eine E-Mail an die Projekt Betreiber schicken.
The request-pull command takes the base branch into which you want your topic branch pulled and the Git repository URL you want them to pull from, and outputs a summary of all the changes you’re asking to be pulled in. For instance, if Jessica wants to send John a pull request, and she’s done two commits on the topic branch she just pushed up, she can run this:
Der request-pull Befehl vergleicht denjenigen Branch, für den deine Änderungen gedacht sind, mit deinem Topic Branch und gibt eine Übersicht der Änderungen aus. Wenn Jessica zwei Änderungen in einem Topic Branch hat und nun John einen pull request schicken will, kann sie folgendes tun:
$ git request-pull origin/master myfork
The following changes since commit 1edee6b1d61823a2de3b09c160d7080b8d1b3a40:
  John Smith (1):
        added a new function

are available in the git repository at:

  git://githost/simplegit.git featureA

Jessica Smith (2):
      add limit to log function
      change log output to 30 from 25

 lib/simplegit.rb |   10 +++++++++-
 1 files changed, 9 insertions(+), 1 deletions(-)
The output can be sent to the maintainer—it tells them where the work was branched from, summarizes the commits, and tells where to pull this work from.
Die Ausgabe kann an den Projekt Betreiber geschickt werden - sie sagt klar, auf welchem Branch die Arbeit basiert, gibt eine Zusammenfassung der Änderungen und gibt an, aus welchem Fork oder Repository man die Änderungen herunterladen kann.
On a project for which you’re not the maintainer, it’s generally easier to have a branch like master always track origin/master and to do your work in topic branches that you can easily discard if they’re rejected. Having work themes isolated into topic branches also makes it easier for you to rebase your work if the tip of the main repository has moved in the meantime and your commits no longer apply cleanly. For example, if you want to submit a second topic of work to the project, don’t continue working on the topic branch you just pushed up — start over from the main repository’s master branch:
Wenn du nicht selbst Betreiber eines bestimmten Projektes bist, ist es im Allgemeinen einfacher, einen Branch master immer dem origin/master Branch tracken (xxx folgen) zu lassen und eigene Änderungen in Topic Branches vorzunehmen, die man leicht wieder löschen kann, wenn sie nicht akzeptiert werden. Wenn du Aspekte deiner Arbeit in Topic Branches isolierst, kannst du sie außerdem recht leicht auf den letzten Stand des Hauptrepositories rebasen, falls das Hauptrepository in der Zwischenzeit weiter entwickelt wurde und deine Commits nicht mehr sauber passen. Wenn du beispielsweise an einem anderen Patch für das Projekt arbeiten willst, verwende dazu nicht weiter den gleichen Topic Branch, den du gerade in deinen Fork hochgeladen hast. Lege statt dessen einen neuen Topic Branch an, der wiederum auf dem master Branch des Hauptrepositories basiert.
$ git checkout -b featureB origin/master
$ (work)
$ git commit
$ git push myfork featureB
$ (email maintainer)
$ git fetch origin
Now, each of your topics is contained within a silo — similar to a patch queue — that you can rewrite, rebase, and modify without the topics interfering or interdepending on each other as in Figure 5-16.
Deine Arbeit an den verschiedenen Patches sind jetzt in Deine Topic Branches isoliert - ähnlich wie in einer Patch Queue - so daß du die einzelnen Topic Branches neu schreiben, rebasen und ändern kannst, ohne daß sie mit einander in Konflikt geraten (siehe Bild 5-16).
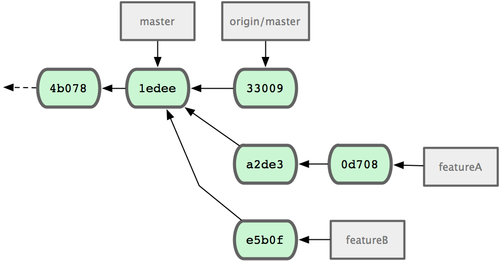
Figure 5-16. Initial commit history with featureB work
Bild 5-16. Ursprüngliche Commit Historie mit dem featureB Branch
Let’s say the project maintainer has pulled in a bunch of other patches and tried your first branch, but it no longer cleanly merges. In this case, you can try to rebase that branch on top of origin/master, resolve the conflicts for the maintainer, and then resubmit your changes:
Sagen wir, der Projekt Betreiber hat eine Reihe von Änderungen Dritter in das Projekt übernommen und deine eigenen Änderungen lassen sich jetzt nicht mehr sauber mergen. In diesem Fall kannst du deine Änderungen auf dem neuen Stand des origin/master Branches rebasen, Konflikte beheben und deine Arbeit erneut einreichen:
$ git checkout featureA
$ git rebase origin/master
$ git push –f myfork featureA
This rewrites your history to now look like Figure 5-17.
Das schreibt deine Commit Historie neu, so daß sie jetzt so aussieht (Bild 5-17):
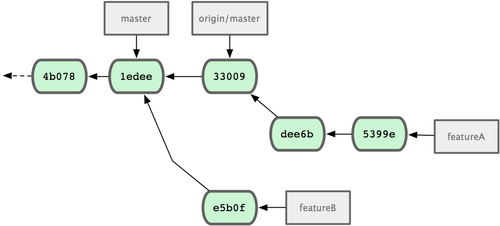
Figure 5-17. Commit history after featureA work
Bild 5-17. Commit Historie nach dem rebase von featureA
Because you rebased the branch, you have to specify the –f to your push command in order to be able to replace the featureA branch on the server with a commit that isn’t a descendant of it. An alternative would be to push this new work to a different branch on the server (perhaps called featureAv2).
Weil du den Branch rebased hast, mußt du die Option -f verwenden, um den featureA Branch auf dem Server zu ersetzen, denn du hast die Commit Historie umgeschrieben und nun ist ein Commit enthalten, von dem der gegenwärtig letzte Commit des externen Branches nicht abstammt. Eine Alternative dazu wäre, den Branch jetzt in einen neuen externen Branch zu pushen, z.B. featureAv2.
Let’s look at one more possible scenario: the maintainer has looked at work in your second branch and likes the concept but would like you to change an implementation detail. You’ll also take this opportunity to move the work to be based off the project’s current master branch. You start a new branch based off the current origin/master branch, squash the featureB changes there, resolve any conflicts, make the implementation change, and then push that up as a new branch:
Schauen wir uns noch ein anderes Szenario an: der Projekt Betreiber hat sich deine Arbeit angesehen und will die Änderungen übernehmen, aber er bittet dich, noch eine Kleinigkeit an der Implementierung zu ändern. Du willst die Gelegenheit außerdem nutzen, um deine Änderungen neu auf den gegenwärtigen master Branch des Projektes zu basieren. Du legst dazu einen neuen Branch von origin/master an, übernimmst deine Änderungen dahin, löst ggf. Konflikte auf, nimmst die angeforderte Änderung an der Implementierung vor und lädst die Änderungen auf den Server:
$ git checkout -b featureBv2 origin/master
$ git merge --no-commit --squash featureB
$ (change implementation)
$ git commit
$ git push myfork featureBv2
The --squash option takes all the work on the merged branch and squashes it into one non-merge commit on top of the branch you’re on. The --no-commit option tells Git not to automatically record a commit. This allows you to introduce all the changes from another branch and then make more changes before recording the new commit.
Die --squash Option bewirkt, daß alle Änderungen des Merge Branches (featureB) übernommen werden, ohne aber daß zusätzlich ein Merge Commit angelegt wird. Die --no-commit Option instruiert Git außerdem, nicht automatisch einen Commit anzulegen. Das erlaubt dir, sämtliche Änderungen aus dem anderen Branch zu übernehmen und dann weitere Änderungen vorzunehmen, bevor du das Ganze dann in einem neuen Commit speicherst.
Now you can send the maintainer a message that you’ve made the requested changes and they can find those changes in your featureBv2 branch (see Figure 5-18).
Jetzt kannst du dem Projekt Betreiber eine Nachricht schicken, daß du die angeforderte Änderung vorgenommen hast und daß er deine Arbeit in deinem featureBv2 Branch finden kann (siehe Bild 5-18).
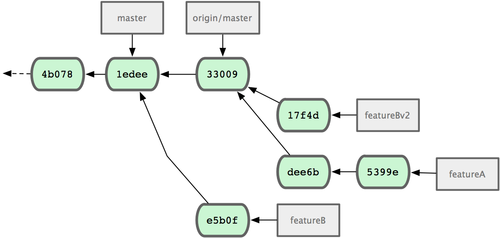
Figure 5-18. Commit history after featureBv2 work
Bild 5-18. Commit Historie mit dem neuen featureBv2 Branch
Public Large Project
Große öffentliche Projekte
Many larger projects have established procedures for accepting patches — you’ll need to check the specific rules for each project, because they will differ. However, many larger public projects accept patches via a developer mailing list, so I’ll go over an example of that now.
Viele große Projekte haben einen etablierten Prozeß, nach dem sie vorgehen, wenn es darum geht, Patches zu akzeptieren. Du mußt dich mit den jeweiligen Regeln vertraut machen, die in jedem Projekt ein bißchen anders sind. Allerdings akzeptieren viele große Projekte Patches per E-Mail über eine Entwickler Mailingliste (xxx oder einen Bugtracker, wie Rails xxx). Deshalb gehen wir auf dieses Beispiel als nächstes ein.
The workflow is similar to the previous use case — you create topic branches for each patch series you work on. The difference is how you submit them to the project. Instead of forking the project and pushing to your own writable version, you generate e-mail versions of each commit series and e-mail them to the developer mailing list:
Der Workflow ist ähnlich wie im vorherigen Szenario. Du legst für jeden Patch oder jede Patch Serie einen Topic Branch an, in dem du arbeitest. Der Unterschied besteht dann darin, auf welchem Wege du die Änderungen an das Projekt schickst. Statt das Projekt zu forken und Änderungen in deinen Fork hochzuladen, erzeugst du eine E-Mail Version deiner Commits und schickst sie als Patch an die Entwickler Mailingliste.
$ git checkout -b topicA
$ (work)
$ git commit
$ (work)
$ git commit
Now you have two commits that you want to send to the mailing list. You use git format-patch to generate the mbox-formatted files that you can e-mail to the list — it turns each commit into an e-mail message with the first line of the commit message as the subject and the rest of the message plus the patch that the commit introduces as the body. The nice thing about this is that applying a patch from an e-mail generated with format-patch preserves all the commit information properly, as you’ll see more of in the next section when you apply these commits:
Jetzt hast du zwei Commits, die du an die Mailingliste schicken willst. Du kannst den Befehl git format-patch verwenden, um aus diesen Commits Dateien zu erzeugen, die im mbox-Format formatiert sind und die du per E-Mail verschicken kannst. Dieser Befehl macht aus jedem Commit eine E-Mail Datei. Die erste Zeile der Commit Meldung wird zum Betreff der E-Mail und der Rest der Commit Meldung sowie der Patch des Commits selbst wird zum Text der E-Mail. Das schöne daran ist, daß wenn man einen auf diese Weise erzeugten Patch benutzt, dann bleiben alle Commit Informationen erhalten. Du kannst das in den nächsten Beispielen sehen:
$ git format-patch -M origin/master
0001-add-limit-to-log-function.patch
0002-changed-log-output-to-30-from-25.patch
The format-patch command prints out the names of the patch files it creates. The -M switch tells Git to look for renames. The files end up looking like this:
Der Befehl git format-patch zeigt dir die Namen der Patch Dateien an, die er erzeugt hat. (Die -M option weist Git an, nach umbenannten Dateien Ausschau zu halten.) Die Dateien sehen dann so aus:
$ cat 0001-add-limit-to-log-function.patch
From 330090432754092d704da8e76ca5c05c198e71a8 Mon Sep 17 00:00:00 2001
From: Jessica Smith <jessica@example.com>
Date: Sun, 6 Apr 2008 10:17:23 -0700
Subject: [PATCH 1/2] add limit to log function

Limit log functionality to the first 20

---
 lib/simplegit.rb |    2 +-
 1 files changed, 1 insertions(+), 1 deletions(-)

diff --git a/lib/simplegit.rb b/lib/simplegit.rb
index 76f47bc..f9815f1 100644
--- a/lib/simplegit.rb
+++ b/lib/simplegit.rb
@@ -14,7 +14,7 @@ class SimpleGit
   end

   def log(treeish = 'master')
-    command("git log #{treeish}")
+    command("git log -n 20 #{treeish}")
   end

   def ls_tree(treeish = 'master')
--
1.6.2.rc1.20.g8c5b.dirty
You can also edit these patch files to add more information for the e-mail list that you don’t want to show up in the commit message. If you add text between the -- line and the beginning of the patch (the lib/simplegit.rb line), then developers can read it; but applying the patch excludes it.
Du kannst diese Patch Dateien anschließend bearbeiten, z.B. um weitere Informationen für die Mailingliste hinzuzufügen, die du nicht in der Commit Meldung haben willst. Wenn du zusätzlichen Text zwischen der -- Zeile und dem Anfang des Patches (der Zeile lib/simplegit.rb in diesem Fall), dann ist er für den Leser sichtbar, aber Git wird ihn ignorieren, wenn man den Patch verwendet.
To e-mail this to a mailing list, you can either paste the file into your e-mail program or send it via a command-line program. Pasting the text often causes formatting issues, especially with “smarter” clients that don’t preserve newlines and other whitespace appropriately. Luckily, Git provides a tool to help you send properly formatted patches via IMAP, which may be easier for you. I’ll demonstrate how to send a patch via Gmail, which happens to be the e-mail agent I use; you can read detailed instructions for a number of mail programs at the end of the aforementioned Documentation/SubmittingPatches file in the Git source code.
Um das jetzt an die Mailingliste zu schicken, kannst du entweder die Datei per copy-and-paste in dein E-Mail Programm kopieren, als Anhang an eine E-Mail anhängen oder du kannst die Dateien mit einem Befehlszeilen Programm direkt verschicken. Patches zu kopieren verursacht oft Formatierungsprobleme - insbesondere mit “smarten” E-Mail Clients, die die Dinge umformatieren, die man einfügt. Zum Glück bringt Git aber ein Tool mit, mit dem man Patches in ihrer korrekten Formatierung über IMAP verschicken kann. In folgendem Beispiel zeige ich, wie man Patches über Gmail verschicken kann, welches der E-Mail Client ist, den ich selbst verwende. Darüberhinaus findest du ausführliche Beschreibungen für zahlreiche E-Mail Programme am Ende der schon erwähnten Datei Documentation/SubmittingPatches im Git Quellcode.
First, you need to set up the imap section in your ~/.gitconfig file. You can set each value separately with a series of git config commands, or you can add them manually; but in the end, your config file should look something like this:
Zunächst mußt du die IMAP Sektion in deiner ~/.gitconfig Datei ausfüllen. Du kannst jeden Wert separat mit dem Befehl git config eingeben oder du kannst die Datei öffnen und sie manuell eingeben. Im Endeffekt sollte deine ~/.gitconfig Datei in etwa so aussehen:
[imap]
  folder = "[Gmail]/Drafts"
  host = imaps://imap.gmail.com
  user = user@gmail.com
  pass = p4ssw0rd
  port = 993
  sslverify = false
If your IMAP server doesn’t use SSL, the last two lines probably aren’t necessary, and the host value will be imap:// instead of imaps://. When that is set up, you can use git send-email to place the patch series in the Drafts folder of the specified IMAP server:
Wenn dein IMAP Server kein SSL verwendet, kannst du die letzten beiden Zeilen wahrscheinlich weglassen und der host dürfte mit imap:// und nicht imaps:// beginnen. Wenn du diese Einstellungen konfiguriert hast, kannst du git send-email verwenden, um deine Patches in den Entwurfsordner des angegebenen IMAP Servers zu kopieren:
$ git send-email *.patch
0001-added-limit-to-log-function.patch
0002-changed-log-output-to-30-from-25.patch
Who should the emails appear to be from? [Jessica Smith <jessica@example.com>]
Emails will be sent from: Jessica Smith <jessica@example.com>
Who should the emails be sent to? jessica@example.com
Message-ID to be used as In-Reply-To for the first email? y
Then, Git spits out a bunch of log information looking something like this for each patch you’re sending:
Git gibt dann für jeden Patch, den du verschickst, ein paar Log Informationen aus, die in etwa so aussehen:
(mbox) Adding cc: Jessica Smith <jessica@example.com> from
  \line 'From: Jessica Smith <jessica@example.com>'
OK. Log says:
Sendmail: /usr/sbin/sendmail -i jessica@example.com
From: Jessica Smith <jessica@example.com>
To: jessica@example.com
Subject: [PATCH 1/2] added limit to log function
Date: Sat, 30 May 2009 13:29:15 -0700
Message-Id: <1243715356-61726-1-git-send-email-jessica@example.com>
X-Mailer: git-send-email 1.6.2.rc1.20.g8c5b.dirty
In-Reply-To: <y>
References: <y>

Result: OK
At this point, you should be able to go to your Drafts folder, change the To field to the mailing list you’re sending the patch to, possibly CC the maintainer or person responsible for that section, and send it off.
Jetzt solltest du in den Entwurfsordner deines E-Mail Clients gehen, als Empfänger Adresse die jeweilige Mailingliste angeben, möglicherweise ein CC an den Projektbetreiber oder einen anderen Verantwortlichen setzen und die E-Mail dann verschicken können.
Summary
Zusammenfassung
This section has covered a number of common workflows for dealing with several very different types of Git projects you’re likely to encounter and introduced a couple of new tools to help you manage this process. Next, you’ll see how to work the other side of the coin: maintaining a Git project. You’ll learn how to be a benevolent dictator or integration manager.
Wir haben jetzt eine Reihe von Workflows besprochen, die für jeweils sehr verschiedene Arten von Projekten üblich sind und denen du vermutlich begegnen wirst. Wir haben außerdem einige neue Tools besprochen, die dabei hilfreich sind, diese Workflows umzusetzen. Als nächstes werden wir auf die andere Seite dieser Medaille eingehen: wie du selbst ein Git Projekt betreiben kannst. Du wirst lernen, wie du als “wohlwollender Diktator” oder als Integration Manager arbeiten kannst.