Ein Projekt betreiben
In addition to knowing how to effectively contribute to a project, you’ll likely need to know how to maintain one. This can consist of accepting and applying patches generated via format-patch and e-mailed to you, or integrating changes in remote branches for repositories you’ve added as remotes to your project. Whether you maintain a canonical repository or want to help by verifying or approving patches, you need to know how to accept work in a way that is clearest for other contributors and sustainable by you over the long run.
Neben dem Wissen, das du brauchst, um zu einem bestehenden Projekt Änderungen beizutragen, wirst du vermutlich wissen wollen, wie du selbst ein Projekt betreiben kannst. Dazu willst du Patches akzeptieren und anwenden, die per git format-patch erzeugt und dir per E-Mail geschickt wurden. Oder du willst Änderungen aus externen Branches übernehmen, die du zu deinem Projekt hinzugefügt hast. Ob du nun für das Hauptrepository verantwortlich bist oder ob du dabei helfen willst, Patches zu verifizieren und zu bestätigen - in beiden Fällen mußt du wissen, wie du Änderungen in einer Weise übernehmen kannst, die für andere Mitarbeiter nachvollziehbar und für dich selbst tragbar ist.
Working in Topic Branches
In Topic Branches arbeiten
When you’re thinking of integrating new work, it’s generally a good idea to try it out in a topic branch — a temporary branch specifically made to try out that new work. This way, it’s easy to tweak a patch individually and leave it if it’s not working until you have time to come back to it. If you create a simple branch name based on the theme of the work you’re going to try, such as ruby_client or something similarly descriptive, you can easily remember it if you have to abandon it for a while and come back later. The maintainer of the Git project tends to namespace these branches as well — such as sc/ruby_client, where sc is short for the person who contributed the work. As you’ll remember, you can create the branch based off your master branch like this:
Wenn du Änderungen von anderen übernehmen willst, ist normalerweise eine gute Idee, sie in einem Topic Branch auszuprobieren - d.h., einem temporären Branch, dessen Zweck nur darin besteht, die jeweiligen Änderungen auszuprobieren. Auf diese Weise ist es einfach, Patches ggf. anzupassen oder sie im Zweifelsfall im Topic Branch liegen zu lassen, wenn sie nicht funktionieren und du im Moment nicht die Zeit hast, dich weiter damit zu befassen. Es ist empfehlenswert, Topic Branches Namen zu geben, die gut kommunizieren, worum es sich bei den jeweiligen Änderungen dreht, wie z.B. ruby_client oder etwas ähnlich aussagekräftiges, das dir hilft, dich daran zu erinnern. Der Projekt Betreiber des Git Projektes selbst vergibt Namensräume für solche Branches - wie z.B. sc/ruby_client, wobei sc ein Kürzel für den jeweiligen Autor des Patches ist. Wie du inzwischen weißt, kannst du einen neuen Branch, der auf dem gegenwärtigen master Branch basiert, wie folgt erzeugen (xxx falsch, das stimmt nur, wenn master der aktuelle Branch ist xxx):
$ git branch sc/ruby_client masterOr, if you want to also switch to it immediately, you can use the checkout -b option:
Oder, wenn außerdem direkt zu dem neuen Branch wechseln willst, kannst du die -b für den git checkout Befehl verwenden:
$ git checkout -b sc/ruby_client masterNow you’re ready to add your contributed work into this topic branch and determine if you want to merge it into your longer-term branches.
Nachdem du jetzt einen Topic Branch angelegt hast, kannst du die Änderungen zu diesem Branch hinzufügen, um herauszufinden, ob du sie dauerhaft in einen offiziellen Branch übernehmen willst.
Applying Patches from E-mail
Patches aus E-Mails verwenden
If you receive a patch over e-mail that you need to integrate into your project, you need to apply the patch in your topic branch to evaluate it. There are two ways to apply an e-mailed patch: with git apply or with git am.
Wenn du einen Patch, den du auf dein Projekt anwenden willst, per E-Mail erhältst, gibt es zwei Möglichkeiten, das zu tun: git apply und git am.
Applying a Patch with apply
Einen Patch verwenden: git apply
If you received the patch from someone who generated it with the git diff or a Unix diff command, you can apply it with the git apply command. Assuming you saved the patch at /tmp/patch-ruby-client.patch, you can apply the patch like this:
Wenn der Patch mit git diff oder dem Unix Befehl diff erzeugt wurde, dann kannst du ihn mit dem Befehl git apply anwenden. Nehmen wir an, du hast den Patch nach /tmp/patch-ruby-client.patch gespeichert. Dann kannst du ihn wie folgt verwenden:
$ git apply /tmp/patch-ruby-client.patchThis modifies the files in your working directory. It’s almost identical to running a patch -p1 command to apply the patch, although it’s more paranoid and accepts fewer fuzzy matches then patch. It also handles file adds, deletes, and renames if they’re described in the git diff format, which patch won’t do. Finally, git apply is an “apply all or abort all” model where either everything is applied or nothing is, whereas patch can partially apply patchfiles, leaving your working directory in a weird state. git apply is over all much more paranoid than patch. It won’t create a commit for you — after running it, you must stage and commit the changes introduced manually.
Das ändert die Dateien in deinem Git Arbeitsverzeichnis. Das ist fast das selbe wie wenn du den Unix Befehl patch -p1 verwendest. Der Git Befehl ist aber paranoider und akzeptiert nicht so viele unklare Übereinstimmungen. Außerdem kann er mit neu hinzugefügten, gelöschten und umbenannten Dateien umgehen, was der Unix Befehl patch nicht kann. Schließlich ist git apply ein “alles oder nichts” Befehl, der entweder alle Änderungen übernimmt oder gar keine (wenn bei einem etwas schief geht), während patch Änderungen auch teilweise übernimmt, so daß er dein Arbeitsverzeichnis gegebenenfalls in einem unbrauchbaren Zustand hinterläßt. git apply ist also insgesamt strenger als patch. Es legt im übrigen keinen Commit für dich an. Nachdem du git apply ausgeführt hast, mußt du die Änderungen manuell zur Staging Area hinzufügen und comitten.
You can also use git apply to see if a patch applies cleanly before you try actually applying it — you can run git apply --check with the patch:
Du kannst git apply --check verwenden, um zu testen, ob der Patch sauber anwendbar wäre:
$ git apply --check 0001-seeing-if-this-helps-the-gem.patch
error: patch failed: ticgit.gemspec:1
error: ticgit.gemspec: patch does not apply
If there is no output, then the patch should apply cleanly. This command also exits with a non-zero status if the check fails, so you can use it in scripts if you want.
Wenn dieser Befehl nichts ausgibt, sollte der Befehl sauber anwendbar sein.
Applying a Patch with am
Einen Patch verwenden: git am
If the contributor is a Git user and was good enough to use the format-patch command to generate their patch, then your job is easier because the patch contains author information and a commit message for you. If you can, encourage your contributors to use format-patch instead of diff to generate patches for you. You should only have to use git apply for legacy patches and things like that.
Wenn der Autor des Patches selbst mit Git arbeitet, kann er dir das Leben leichter machen, indem er git format-patch verwender, um seinen Patch zu erzeugen: der Patch wird dann die Commit Informationen über den Autor sowie die Commit Meldung enthalten. Es ist also empfehlenswert, Entwickler darum zu bitten und zu ermutigen, git format-patch statt git diff zu verwenden. Du wirst dann git apply nur sehr selten anwenden müssen (xxx legacy patches ??? xxx)
To apply a patch generated by format-patch, you use git am. Technically, git am is built to read an mbox file, which is a simple, plain-text format for storing one or more e-mail messages in one text file. It looks something like this:
Um einen Patch zu verwenden, der mit git format-patch erzeugt wurde, benutzt du den Befehl git am. Technisch gesehen ist git am ein Befehl, der eine mbox Datei lesen kann, d.h. eine einfache Nur-Text-Datei, die eine oder mehrere E-Mails enthalten kann. Eine solche Datei sieht in etwa wie folgt aus:
From 330090432754092d704da8e76ca5c05c198e71a8 Mon Sep 17 00:00:00 2001
From: Jessica Smith <jessica@example.com>
Date: Sun, 6 Apr 2008 10:17:23 -0700
Subject: [PATCH 1/2] add limit to log function

Limit log functionality to the first 20
This is the beginning of the output of the format-patch command that you saw in the previous section. This is also a valid mbox e-mail format. If someone has e-mailed you the patch properly using git send-email, and you download that into an mbox format, then you can point git am to that mbox file, and it will start applying all the patches it sees. If you run a mail client that can save several e-mails out in mbox format, you can save entire patch series into a file and then use git am to apply them one at a time.
Das ist der Anfang der Ausgabe des git format-patch Befehls, die du im vorherigen Abschnitt gesehen hast - und außerdem valides mbox E-Mail Format. Wenn du eine solche Datei im mbox Format erhalten hast und der Absender git send-email korrekt verwendet hat, kannst du git am mit der Datei verwenden und alle darin enthaltenen Patches werden auf dein Projekt angewendet. Wenn du einen E-Mail Client verwendest, der mehrere E-Mails im mbox Format in einer Datei speichern oder exportieren kann, kannst du auch eine ganze Reihe von Patches in eine einzige Datei speichern und dann git am verwenden, um sie nacheinander anzuwenden.
However, if someone uploaded a patch file generated via format-patch to a ticketing system or something similar, you can save the file locally and then pass that file saved on your disk to git am to apply it:
Wenn jemand einen Patch, der mit git format-patch erzeugt wurde, in einem Ticketsystem oder ähnlichem abgelegt hat, kannst du die Datei lokal speichern und dann ebenfalls git am ausführen, um den Patch anzuwenden:
$ git am 0001-limit-log-function.patch
Applying: add limit to log function
You can see that it applied cleanly and automatically created the new commit for you. The author information is taken from the e-mail’s From and Date headers, and the message of the commit is taken from the Subject and body (before the patch) of the e-mail. For example, if this patch was applied from the mbox example I just showed, the commit generated would look something like this:
Der Patch paßte sauber auf die Codebase und hat automatisch einen neuen Commit angelegt. Die Autor Information wurde aus den From und Date Headern der E-Mail übernommen und die Commit Meldung aus dem Subject und Body der E-Mail. Wenn der Patch z.B. aus dem mbox Beispiel von oben stammt, sieht der resultierende Commit wie folgt aus:
$ git log --pretty=fuller -1
commit 6c5e70b984a60b3cecd395edd5b48a7575bf58e0
Author:     Jessica Smith <jessica@example.com>
AuthorDate: Sun Apr 6 10:17:23 2008 -0700
Commit:     Scott Chacon <schacon@gmail.com>
CommitDate: Thu Apr 9 09:19:06 2009 -0700

   add limit to log function

   Limit log functionality to the first 20
The Commit information indicates the person who applied the patch and the time it was applied. The Author information is the individual who originally created the patch and when it was originally created.
Das Commit Feld zeigt den Namen desjenigen, der den Patch angewendet hat und CommitDate das jeweilige Datum und Uhrzeit. Die Felder Author und AuthorDate geben an, wer den Commit wann angelegt hat.
But it’s possible that the patch won’t apply cleanly. Perhaps your main branch has diverged too far from the branch the patch was built from, or the patch depends on another patch you haven’t applied yet. In that case, the git am process will fail and ask you what you want to do:
Es ist allerdings möglich, daß der Patch nicht sauber auf den gegenwärtigen Code paßt. Möglicherweise unterscheidet sich der jeweilige Branch inzwischen erheblich von dem Zustand, in dem er sich befand, als die in dem Patch enthaltenen Änderungen geschrieben wurden. In dem Fall wird git am fehlschlagen und dir mitteilen, was zu tun ist:
$ git am 0001-seeing-if-this-helps-the-gem.patch
Applying: seeing if this helps the gem
error: patch failed: ticgit.gemspec:1
error: ticgit.gemspec: patch does not apply
Patch failed at 0001.
When you have resolved this problem run "git am --resolved".
If you would prefer to skip this patch, instead run "git am --skip".
To restore the original branch and stop patching run "git am --abort".
This command puts conflict markers in any files it has issues with, much like a conflicted merge or rebase operation. You solve this issue much the same way — edit the file to resolve the conflict, stage the new file, and then run git am --resolved to continue to the next patch:
Der Befehl fügt Konfliktmarkierungen in allen problematischen Dateien ein, so wie bei einem konfligierenden Merge oder Rebase. Und du kannst den Konflikt in der selben Weise beheben: die Datei bearbeiten, die Änderungen zur Staging Area hinzufügen und dann git am --resolved ausführen, um mit dem jeweils nächsten Patch (falls vorhanden) fortzufahren.
$ (fix the file)
$ git add ticgit.gemspec
$ git am --resolved
Applying: seeing if this helps the gem
If you want Git to try a bit more intelligently to resolve the conflict, you can pass a -3 option to it, which makes Git attempt a three-way merge. This option isn’t on by default because it doesn’t work if the commit the patch says it was based on isn’t in your repository. If you do have that commit — if the patch was based on a public commit — then the -3 option is generally much smarter about applying a conflicting patch:
Wenn Du willst, daß Git versucht, einen Konflikt etwas intelligenter zu lösen, kannst du die -3 Option angeben, so daß Git einen 3-Wege-Merge versucht. Dies ist deshalb nicht der Standard, weil ein 3-Wege-Merge nicht funktioniert, wenn der Commit, auf dem der Patch basiert, nicht Teil deines Repositories ist. Wenn du den Commit allerdings in deiner Historie hast, d.h. wenn der Patch auf einem öffentlichen Commit basiert, dann ist die -3 Option oft die bessere Variante, um einen konfligierenden Patch anzuwenden:
$ git am -3 0001-seeing-if-this-helps-the-gem.patch
Applying: seeing if this helps the gem
error: patch failed: ticgit.gemspec:1
error: ticgit.gemspec: patch does not apply
Using index info to reconstruct a base tree...
Falling back to patching base and 3-way merge...
No changes -- Patch already applied.
In this case, I was trying to apply a patch I had already applied. Without the -3 option, it looks like a conflict.
In diesem Fall habe ich versucht, einen Patch anzuwenden, der ich bereits zuvor angewendet hatte. Ohne die -3 Option würde ich einen Konflikt erhalten.
If you’re applying a number of patches from an mbox, you can also run the am command in interactive mode, which stops at each patch it finds and asks if you want to apply it:
Wenn du eine Reihe von Patches aus einer Datei im mbox Format anwendest, kannst du außerdem den git am Befehl in einem interaktiven Modus ausführen. In diesem Modus hält Git bei jedem Patch an und fragt dich jeweils, ob du den Patch anwenden willst:
$ git am -3 -i mbox
Commit Body is:
--------------------------
seeing if this helps the gem
--------------------------
Apply? [y]es/[n]o/[e]dit/[v]iew patch/[a]ccept all
This is nice if you have a number of patches saved, because you can view the patch first if you don’t remember what it is, or not apply the patch if you’ve already done so.
Das ist praktisch, wenn du eine ganze Reihe von Patches in einer Datei hast. Du kannst jeweils Patches anzeigen, an die du dich nicht erinnern kannst, oder Patches auslassen, z.B. weil du sie schon zuvor angewendet hattest.
When all the patches for your topic are applied and committed into your branch, you can choose whether and how to integrate them into a longer-running branch.
Nachdem du alle Patches in deinem Topic Branch angewendet hast, kannst du die Änderungen durchsehen, testen und entscheiden, ob du sie in einen dauerhaft bestehenden Branch übernehmen willst.
Checking Out Remote Branches
If your contribution came from a Git user who set up their own repository, pushed a number of changes into it, and then sent you the URL to the repository and the name of the remote branch the changes are in, you can add them as a remote and do merges locally.
Möglicherweise kommen die Änderungen aber nicht als Patch sondern von einem Git Anwender, der sein eigenes Repository aufgesetzt hat, seine Änderungen dorthin hochgeladen und dir dann die URL des Repositories und den Namen des Branches geschickt hat. In diesem Fall kannst du das Repository als ein “remote” (externes Repository) hinzufügen und die Änderungen lokal mergen.
For instance, if Jessica sends you an e-mail saying that she has a great new feature in the ruby-client branch of her repository, you can test it by adding the remote and checking out that branch locally:
Wenn Dir z.B. Jessica eine E-Mail schickt und mitteilt, daß sie ein großartiges, neues Feature im ruby-client Branch ihres Repositories hat, dann kannst du das Feature testen, indem du das Repository als externes Repository deines Projektes konfigurieren und den Branch lokal auscheckst:
$ git remote add jessica git://github.com/jessica/myproject.git
$ git fetch jessica
$ git checkout -b rubyclient jessica/ruby-client
If she e-mails you again later with another branch containing another great feature, you can fetch and check out because you already have the remote setup.
Wenn sie dir später erneut eine E-Mail mit einem anderen Branch schickt, der ein anderes, großartiges Feature enthält, dann kannst du diesen Branch direkt herunterladen und auschecken, weil du das externe Repository noch konfiguriert hast.
This is most useful if you’re working with a person consistently. If someone only has a single patch to contribute once in a while, then accepting it over e-mail may be less time consuming than requiring everyone to run their own server and having to continually add and remove remotes to get a few patches. You’re also unlikely to want to have hundreds of remotes, each for someone who contributes only a patch or two. However, scripts and hosted services may make this easier — it depends largely on how you develop and how your contributors develop.
Dies ist insbesondere nützlich, wenn du mit jemandem regelmäßig zusammen arbeitest. Wenn jemand lediglich gelegentlich einen einzelnen Patch beiträgt, dann ist es wahrscheinlich weniger aufwendig, ihn per E-Mail zu akzeptieren, als von jedem zu erwarten, einen eigenen Server zu betreiben, und selbst ständig externe Repositories hinzuzufügen und zu entfernen. Du wirst kaum hunderte von externen Repositories verwalten wollen, nur um von jedem ein paar Änderungen zu erhalten. Auf der anderen Seite erleichtern dir Scripts und Hosted Services diesen Prozeß. Es hängt also alles davon ab, wie du selbst und wie deine Mitarbeiter entwickeln.
The other advantage of this approach is that you get the history of the commits as well. Although you may have legitimate merge issues, you know where in your history their work is based; a proper three-way merge is the default rather than having to supply a -3 and hope the patch was generated off a public commit to which you have access.
Wenn du mit jemandem nicht regelmäßig zusammen arbeitest, aber trotzdem aus ihrem Repository mergen willst, dann kannst du dem git pull Befehl die URL ihres externen Repositories übergeben. Das lädt den entsprechenden Branch einmalig herunter und merged ihn in deinen aktuellen Branch, ohne aber die externe URL als eine Referenz zu speichern:
If you aren’t working with a person consistently but still want to pull from them in this way, you can provide the URL of the remote repository to the git pull command. This does a one-time pull and doesn’t save the URL as a remote reference:
$ git pull git://github.com/onetimeguy/project.git
From git://github.com/onetimeguy/project
 * branch            HEAD       -> FETCH_HEAD
Merge made by recursive.
Determining What Is Introduced
Neuigkeiten durchsehen
Now you have a topic branch that contains contributed work. At this point, you can determine what you’d like to do with it. This section revisits a couple of commands so you can see how you can use them to review exactly what you’ll be introducing if you merge this into your main branch.
Du hast jetzt einen Topic Branch, der die neuen Änderungen enthält, und kannst jetzt herausfinden, was du damit anfangen willst. In diesem Abschnitt gehen wir noch mal auf einige Befehle ein, die nützlich sind, um herauszufinden, welche Änderungen du übernehmen würdest, wenn du den Topic Branch in deinen Hauptbranch mergest.
It’s often helpful to get a review of all the commits that are in this branch but that aren’t in your master branch. You can exclude commits in the master branch by adding the --not option before the branch name. For example, if your contributor sends you two patches and you create a branch called contrib and applied those patches there, you can run this:
Es ist in der Regel hilfreich, sich Commits anzusehen, die sich in diesem Branch, nicht aber im master Branch befinden. Du kannst Commits aus dem master Branch ausschließen, indem du die --not Option verwendest. Wenn du beispielsweise zwei neue Commits erhalten und sie in einen Topic Branch contrib übernommen hast, kannst du folgendes tun:
$ git log contrib --not master
commit 5b6235bd297351589efc4d73316f0a68d484f118
Author: Scott Chacon <schacon@gmail.com>
Date:   Fri Oct 24 09:53:59 2008 -0700

    seeing if this helps the gem

commit 7482e0d16d04bea79d0dba8988cc78df655f16a0
Author: Scott Chacon <schacon@gmail.com>
Date:   Mon Oct 22 19:38:36 2008 -0700

    updated the gemspec to hopefully work better
To see what changes each commit introduces, remember that you can pass the -p option to git log and it will append the diff introduced to each commit.
Wie du schon gelernt hast, kannst du außerdem die Option -p verwenden, um zu sehen, welche Diffs die Commits enthalten.
To see a full diff of what would happen if you were to merge this topic branch with another branch, you may have to use a weird trick to get the correct results. You may think to run this:
Wenn du ein vollständiges Diff aller Änderungen sehen willst, die dein Topic Branch gegenüber z.B. dem master Branch enthält, brauchst du einen Trick. Möglicherweise würdest du zuerst das hier ausprobieren:
$ git diff masterThis command gives you a diff, but it may be misleading. If your master branch has moved forward since you created the topic branch from it, then you’ll get seemingly strange results. This happens because Git directly compares the snapshots of the last commit of the topic branch you’re on and the snapshot of the last commit on the master branch. For example, if you’ve added a line in a file on the master branch, a direct comparison of the snapshots will look like the topic branch is going to remove that line.
Der Befehl gibt dir ein Diff aus, kann aber irreführend sein. Wenn im master Branch Änderungen committed wurden, seit der Branch angelegt wurde, erhältst du scheinbar merkwürdige Ergebnisse. Das liegt daran, daß Git den Snapshot des letzten Commits des Topic Branches, in dem du dich momentan befindest, mit dem letzten Commit des master Branches vergleicht. Wenn du beispielsweise eine Zeile in einer Datei im master branch hinzugefügt hast, scheint der direkte Vergleich auszusagen, daß diese Zeile im Topic Branch entfernt wurde.
If master is a direct ancestor of your topic branch, this isn’t a problem; but if the two histories have diverged, the diff will look like you’re adding all the new stuff in your topic branch and removing everything unique to the master branch.
Wenn master ein direkter Vorfahr deines Topic Branches ist, ist das kein Problem. Aber wenn sich die beiden Historien auseinander bewegt (xxx) haben, dann scheint das Diff auszusagen, daß du alle Neuigkeiten im Topic Branch hinzufügst und alle Neuigkeiten im master Branch entfernst.
What you really want to see are the changes added to the topic branch — the work you’ll introduce if you merge this branch with master. You do that by having Git compare the last commit on your topic branch with the first common ancestor it has with the master branch.
Was du aber eigentlich wissen willst, ist welche Änderungen der Topic Branch hinzugefügt hat, d.h. die Änderungen, die du in den master Branch neu einführen würdest, wenn du den Topic Branch mergest. Dieses Ergebnis erhälst du, wenn du den letzten Commit im Topic Branch mit dem letzten Commit vergleichst, den der Topic Branch mit master gemeinsam hat.
Technically, you can do that by explicitly figuring out the common ancestor and then running your diff on it:
Technisch gesehen könntest du den letzten gemeinsamen Commit explizit erfragen und dann ein Diff darauf ausführen:
$ git merge-base contrib master
36c7dba2c95e6bbb78dfa822519ecfec6e1ca649
$ git diff 36c7db
However, that isn’t convenient, so Git provides another shorthand for doing the same thing: the triple-dot syntax. In the context of the diff command, you can put three periods after another branch to do a diff between the last commit of the branch you’re on and its common ancestor with another branch:
Das ist natürlich nicht sonderlich bequem, weshalb Git eine Kurzform dafür definiert: die triple-dot Syntax (xxx). Im Context des git diff Befehls bewirkt dies, daß du ein Diff erhältst, das den letzten gemeinsamen Commit der Histories beider angegebener Branches mit dem letzten Commit des zuletzt angegebenen Branches vergleicht:
$ git diff master...contribThis command shows you only the work your current topic branch has introduced since its common ancestor with master. That is a very useful syntax to remember.
Dieser Befehl zeigt dir diejenigen Änderungen, die im Topic Branch eingeführt wurden, die aber noch nicht in master enthalten sind.
Integrating Contributed Work
Beiträge anderer integrieren
When all the work in your topic branch is ready to be integrated into a more mainline branch, the question is how to do it. Furthermore, what overall workflow do you want to use to maintain your project? You have a number of choices, so I’ll cover a few of them.
Sobald du die Änderungen in deinem Topic Branch in einen dauerhafteren Branch übernehmen willst, fragt sich, wie du das anstellen kannst. Und welchen generellen Workflow willst du verwenden, um das Projekt zu pflegen? Wir werden eine Reihe von Möglichkeiten besprechen, die dir zur Verfügung stehen.
Merging Workflows
Merge Workflows
One simple workflow merges your work into your master branch. In this scenario, you have a master branch that contains basically stable code. When you have work in a topic branch that you’ve done or that someone has contributed and you’ve verified, you merge it into your master branch, delete the topic branch, and then continue the process. If we have a repository with work in two branches named ruby_client and php_client that looks like Figure 5-19 and merge ruby_client first and then php_client next, then your history will end up looking like Figure 5-20.
Eine einfache Möglichkeit besteht darin, deine Arbeit einfach in den master Branch zu mergen. In diesem Workflow hast du einen master Branch, der eine stabilen Code beinhaltet. Wenn du Änderungen in einem Topic Branch hast, die von dir selbst oder jemand anderem geschrieben und die verifiziert sind, dann mergest du diesen Topic Branch in den master Branch, löschst den Topic Branch und fährst mit diesem Prozeß so fort. Wenn es ein Repository mit zwei Branches gibt, die ruby_client und php_client heißen (wie in Bild 5-19), und du mergest ruby_client zuerst und php_client danach, dann wird die Historie danach aussehen wie im Bild 5-20.
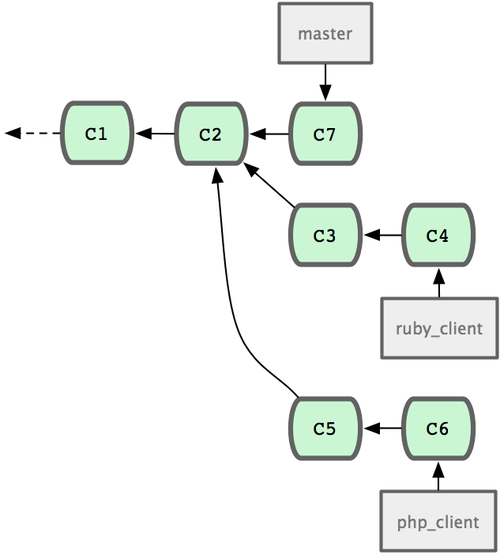
Figure 5-19. History with several topic branches
Bild 5-19. Historie mit verschiedenen Topic Branches
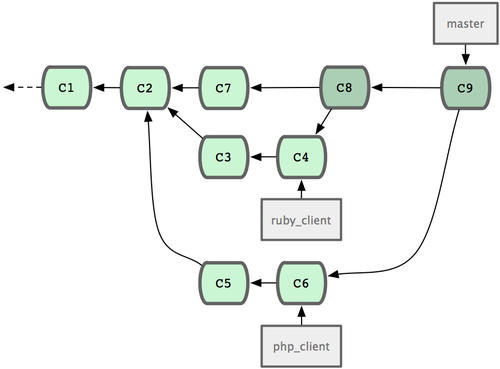
Figure 5-20. After a topic branch merge
Bild 5-20. Nach dem Merge mit verschiedenen Topic Branches
That is probably the simplest workflow, but it’s problematic if you’re dealing with larger repositories or projects.
Dies ist vermutlich der einfachste, mögliche Workflow. Er ist allerdings für große Repositories oder Projekte manchmal problematisch.
If you have more developers or a larger project, you’ll probably want to use at least a two-phase merge cycle. In this scenario, you have two long-running branches, master and develop, in which you determine that master is updated only when a very stable release is cut and all new code is integrated into the develop branch. You regularly push both of these branches to the public repository. Each time you have a new topic branch to merge in (Figure 5-21), you merge it into develop (Figure 5-22); then, when you tag a release, you fast-forward master to wherever the now-stable develop branch is (Figure 5-23).
Wenn du mehr Entwickler oder ein größeres Projekt hast, wirst du in der Regel einen Merge Zyklus mit mindestens zwei Phasen verwenden wollen. In einem solchen Workflow hast du dann zwei dauerhafte Branches, z.B. master und develop, wobei master ausschließlich sehr stabile Releases enthält und neuer Code im develop Branch integriert wird. Jedes Mal, wenn du einen neuen Topic Branch mergen willst, mergest du ihn nach develop (Bild 5-22). Und nur dann, wenn du einen Release taggen willst, führst du ein fast-forward (xxx) it master bis zum gegenwärtigen, nun stabilen Status des develop Branch durch.
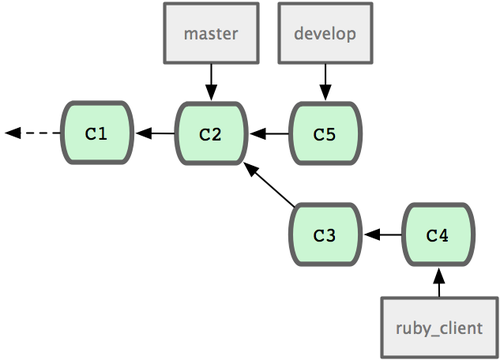
Figure 5-21. Before a topic branch merge
Bild 5-21. Vor dem Topic Branch Merge
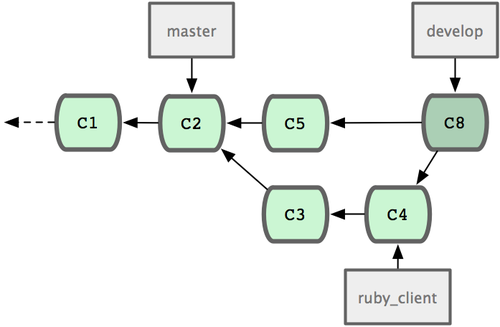
Figure 5-22. After a topic branch merge
Bild 5-22. Nach dem Topic Branch Merge
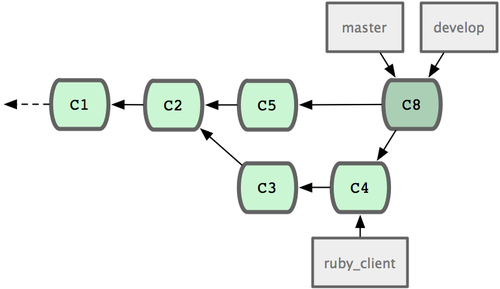
Figure 5-23. After a topic branch release
BIld 5-23. Nach dem Topic Branch Release
This way, when people clone your project’s repository, they can either check out master to build the latest stable version and keep up to date on that easily, or they can check out develop, which is the more cutting-edge stuff. You can also continue this concept, having an integrate branch where all the work is merged together. Then, when the codebase on that branch is stable and passes tests, you merge it into a develop branch; and when that has proven itself stable for a while, you fast-forward your master branch.
Auf diese Weise kann jeder, der dein Repository klont, auf einfache Weise deinen aktuellen master Branch verwenden und ihn auf neue Releases aktualisieren. Oder er kann den develop Branch ausprobieren, in dem sich die jeweils letzten, brandneuen Änderungen befinden. Du kannst dieses Konzept noch weiterführen, indem du einen integrate Branch pflegst, in den neue Änderungen jeweils integriert werden. Sobald der Code in diesem Branch stabil zu sein scheint und alle Tests durchlaufen (xxx), übernimmst du die Änderungen in den develop Branch. Und wenn sie sich für eine Weile in der Praxis als stabil erwiesen haben, fast-forwardest (xxx) du den master Branch.
Large-Merging Workflows
Workflows für umfassende Merges
The Git project has four long-running branches: master, next, and pu (proposed updates) for new work, and maint for maintenance backports. When new work is introduced by contributors, it’s collected into topic branches in the maintainer’s repository in a manner similar to what I’ve described (see Figure 5-24). At this point, the topics are evaluated to determine whether they’re safe and ready for consumption or whether they need more work. If they’re safe, they’re merged into next, and that branch is pushed up so everyone can try the topics integrated together.
Das Git Projekt selbst hat view dauerhafte Branches: master, next, pu (“proposed updates”, d.h. vorgeschlagene Änderungen) und maint (“maintenance backports”, d.h. xxx Rückportierungen). Wenn neue Änderungen herein kommen, werden sie in Topic Branches im Projekt Repository gesammelt, ganz ähnlich wie wir gerade besprochen haben (siehe Bild 5-24). Dann wird evaluiert, ob die Änderungen sicher sind und übernommen werden sollen oder ob sie noch weiter bearbeitet werden müssen. Wenn sie übernommen werden sollen, werden sie in den Branch next gemerged und dieser Branch wird hochgeladen, so daß jeder ausprobieren kann, wie die neue Codebase funktioniert, nachdem die Änderungen miteinander integriert wurden.
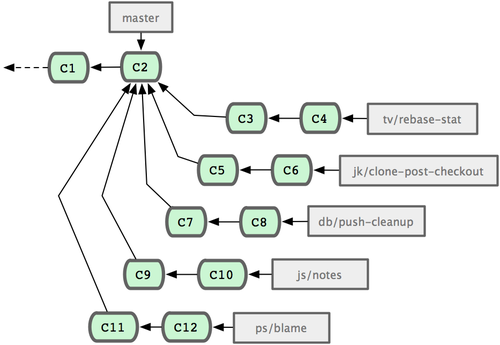
Figure 5-24. Managing a complex series of parallel contributed topic branches
Bild 5-24. Komplexe, parallel entwickelte Topic Branches verwalten
If the topics still need work, they’re merged into pu instead. When it’s determined that they’re totally stable, the topics are re-merged into master and are then rebuilt from the topics that were in next but didn’t yet graduate to master. This means master almost always moves forward, next is rebased occasionally, and pu is rebased even more often (see Figure 5-25).
Wenn die Topic Branches noch weiter bearbeitet werden müssen, werden sie statt dessen in den pu Branch gemerged. Wenn sie dann stabil sind, werden sie erneut in master gemerged und aus denjenigen Änderungen neu aufgebaut, die sich in next befanden, es aber noch nicht bis in den master Branch geschafft haben (xxx wie jetzt?? xxx). D.h., master bewegt sich fast ständig, next wird gelegentlich rebased, und pu wird noch sehr viel häufiger rebased (siehe Bild 5-25).
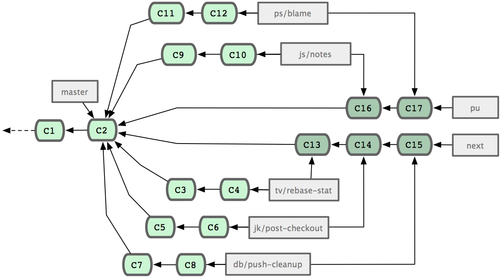
Figure 5-25. Merging contributed topic branches into long-term integration branches
Bild 5-25. Topic Branches in dauerhafte Integrationsbranches mergen
When a topic branch has finally been merged into master, it’s removed from the repository. The Git project also has a maint branch that is forked off from the last release to provide backported patches in case a maintenance release is required. Thus, when you clone the Git repository, you have four branches that you can check out to evaluate the project in different stages of development, depending on how cutting edge you want to be or how you want to contribute; and the maintainer has a structured workflow to help them vet new contributions.
Wenn ein Topic Branch schließlich in master gemerged wird, wird er aus dem Repository gelöscht. Das Git Projekt hat außerdem einen maint Branch, der jeweils vom letzten Release verzweigt. In diesem Branch werden rückportierte Patches für den Fall gesammelt, daß ein Maintenance Release nötig ist. D.h., wenn du das Git Projekt Repository klonst, findest du vier Branches des Projektes in verschiedenen Stadien, die du jeweils ausprobieren kannst, je nachdem wie hochaktuellen Code du testen oder wie du zu dem Projekt beitragen willst. Und der Projekt Betreiber hat auf diese Weise einen klar strukturierten Workflow, der es einfacher macht, neue Beiträge zu prüfen und zu verarbeiten.
Rebasing and Cherry Picking Workflows
Rebase und Cherry Picking Workflows
Other maintainers prefer to rebase or cherry-pick contributed work on top of their master branch, rather than merging it in, to keep a mostly linear history. When you have work in a topic branch and have determined that you want to integrate it, you move to that branch and run the rebase command to rebuild the changes on top of your current master (or develop, and so on) branch. If that works well, you can fast-forward your master branch, and you’ll end up with a linear project history.
Andere Betreiber bevorzugen, neue Änderungen auf der Basis ihres master Branches zu rebasen oder zu cherry-picken statt sie zu mergen, um auf diese Weise eine eher lineare Historie zu erhalten. Wenn du Änderungen in einem Topic Branch hast, die du integrieren willst, dann gehst du in diesen Branch und führst den rebase Befehl aus, um diese Änderungen auf der Basis des gegenwärtigen master Branches (oder irgendeines anderen, stabileren Branches) neu zu schreiben. Wenn das glatt läuft, kannst du den master Branch fast-forwarden (xxx) und erhältst so eine lineare Projekt Historie.
The other way to move introduced work from one branch to another is to cherry-pick it. A cherry-pick in Git is like a rebase for a single commit. It takes the patch that was introduced in a commit and tries to reapply it on the branch you’re currently on. This is useful if you have a number of commits on a topic branch and you want to integrate only one of them, or if you only have one commit on a topic branch and you’d prefer to cherry-pick it rather than run rebase. For example, suppose you have a project that looks like Figure 5-26.
Eine andere Möglichkeit, Commits aus einem Branch in einen anderen zu übernehmen ist der cherry-pick Befehl. In Git ist dieser Befehl quasi ein rebase für einen einzelnen Commit. Er nimmt den Patch, der mit dem Commit eingeführt wurde, und versucht, diesen auf den Branch anzuwenden, in dem du dich gerade befindest. Das ist nützlich, wenn du in einem Topic Branch eine Anzahl von Commits hast, aber lediglich einen davon übernehmen willst. Oder wenn du überhaupt nur einen Commit im Topic Branch hast, diesen aber lieber cherry-picken willst, statt den ganzen Branch zu rebasen. Nehmen wir z.B. an, du hast ein Projekt, das so aussieht wie in Bild 5-26.
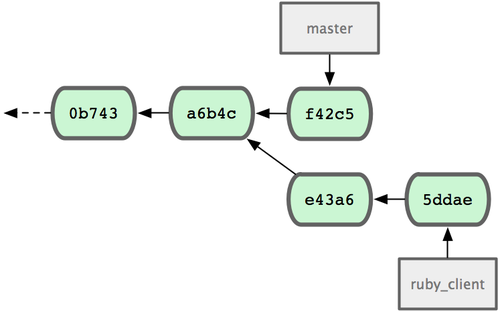
Figure 5-26. Example history before a cherry pick
Bild 5-26. Beispiel Historie vor einem cherry-pick
If you want to pull commit e43a6 into your master branch, you can run
Wenn du den Commit e43a6 in deinen master Branch übernehmen willst, kannst du folgendes ausführen:
$ git cherry-pick e43a6fd3e94888d76779ad79fb568ed180e5fcdf
Finished one cherry-pick.
[master]: created a0a41a9: "More friendly message when locking the index fails."
 3 files changed, 17 insertions(+), 3 deletions(-)
This pulls the same change introduced in e43a6, but you get a new commit SHA-1 value, because the date applied is different. Now your history looks like Figure 5-27.
Das wendet dieselben Änderungen, die in e43a6 eingeführt wurden, auf den master Branch an, aber du erhältst einen neuen Commit SHA-1 Hash, weil auch das Datum ein anderes ist. Jetzt sieht deine Historie so aus:
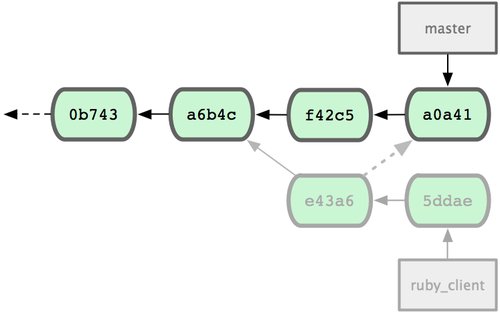
Figure 5-27. History after cherry-picking a commit on a topic branch
Bild 5-27. Historie nach dem cherry-pick eines Commits aus einem Topic Branch
Now you can remove your topic branch and drop the commits you didn’t want to pull in.
Jetzt kannst du den Topic Branch inklusive der ggf. darin enthaltenen Commits löschen, falls du sie nicht noch übernehmen willst.
Tagging Your Releases
Releases taggen
When you’ve decided to cut a release, you’ll probably want to drop a tag so you can re-create that release at any point going forward. You can create a new tag as I discussed in Chapter 2. If you decide to sign the tag as the maintainer, the tagging may look something like this:
Wenn du einen Release herausgeben willst, ist es empfehlenswert, einen Tag dafür anzulegen, so daß man den jeweiligen Zustand der Historie jederzeit leicht wiederherstellen kann. Wir sind bereits in Kapitel 2 auf Git Tags eingegangen. Wenn du als Betreiber den neuen Tag signieren willst, könnte das wie folgt aussehen:
$ git tag -s v1.5 -m 'my signed 1.5 tag'
You need a passphrase to unlock the secret key for
user: "Scott Chacon <schacon@gmail.com>"
1024-bit DSA key, ID F721C45A, created 2009-02-09
If you do sign your tags, you may have the problem of distributing the public PGP key used to sign your tags. The maintainer of the Git project has solved this issue by including their public key as a blob in the repository and then adding a tag that points directly to that content. To do this, you can figure out which key you want by running gpg --list-keys:
Wenn du deine Tags signierst, könnte das Problem bestehen, daß du den jeweiligen öffentlichen PGP key zur Verfügung stellen mußt. Der Betreiber des Git Projektes löst das, in dem er den öffentlichen Schlüssel als Inhalt im Repository selbst zur Verfügung stellt und einen Tag hat, der direkt auf diesen Inhalt zeigt. Um das zu tun, mußt du zunächst herausfinden, welchen Schlüssel du verwenden willst:
$ gpg --list-keys
/Users/schacon/.gnupg/pubring.gpg
---------------------------------
pub   1024D/F721C45A 2009-02-09 [expires: 2010-02-09]
uid                  Scott Chacon <schacon@gmail.com>
sub   2048g/45D02282 2009-02-09 [expires: 2010-02-09]
Then, you can directly import the key into the Git database by exporting it and piping that through git hash-object, which writes a new blob with those contents into Git and gives you back the SHA-1 of the blob:
Dann kannst du den Schlüssel direkt in die Git Datenbank importieren, indem du ihn aus GPG exportierst und die Ausgabe nach git hash-object weiterreichst. Das schreibt ein neues Objekt mit dem Schlüssel in die Git Datenbank und gibt dir einen SHA-1 Hash zurück, der dieses Objekt referenziert:
$ gpg -a --export F721C45A | git hash-object -w --stdin
659ef797d181633c87ec71ac3f9ba29fe5775b92
Now that you have the contents of your key in Git, you can create a tag that points directly to it by specifying the new SHA-1 value that the hash-object command gave you:
Nachdem du jetzt den Schlüssel im Repository hast, kannst du einen Tag für den SHA-1 Hash anlegen, den git hash-object zurückgegeben hat:
$ git tag -a maintainer-pgp-pub 659ef797d181633c87ec71ac3f9ba29fe5775b92If you run git push --tags, the maintainer-pgp-pub tag will be shared with everyone. If anyone wants to verify a tag, they can directly import your PGP key by pulling the blob directly out of the database and importing it into GPG:
Wenn du git push --tags ausführst, wird jetzt der maintainer-pgp-pub Tag auf den Server geladen, so daß jeder darauf zugreifen kann. Wenn jemand jetzt einen signierten Tag verifizieren will, kann er deinen öffentlichen PGP Schlüssel direkt aus der Datenbank holen und in seinen Schlüsselbund importieren:
$ git show maintainer-pgp-pub | gpg --importThey can use that key to verify all your signed tags. Also, if you include instructions in the tag message, running git show <tag> will let you give the end user more specific instructions about tag verification.
Dieser Schlüssel kann anschließend für alle signierten Tages verwendet werden. Zusätzlich kannst du deinen Anwendern in der Tag Meldung erklären, wie sie signierte Tags mit diesem Schlüssel verifizieren können.
Generating a Build Number
Eine Build Nummer generieren
Because Git doesn’t have monotonically increasing numbers like ‘v123’ or the equivalent to go with each commit, if you want to have a human-readable name to go with a commit, you can run git describe on that commit. Git gives you the name of the nearest tag with the number of commits on top of that tag and a partial SHA-1 value of the commit you’re describing:
Weil Git keine globalen Nummern wie v123 kennt, die mit jedem Commit monoton hochgezählt werden, kannst du, um einen leicht lesbaren Bezeichner für einen bestimmten Commit zu erhalten, den Befehl git describe auf diesen Befehl ausführen. Git erzeugt dann einen Bezeichner zurück, der den Namen des nächsten Tags enthält, der Anzahl der Commits seit diesem Tag und die ersten Zeichen des SHA-1 Hashs des Commits:
$ git describe master
v1.6.2-rc1-20-g8c5b85c
This way, you can export a snapshot or build and name it something understandable to people. In fact, if you build Git from source code cloned from the Git repository, git --version gives you something that looks like this. If you’re describing a commit that you have directly tagged, it gives you the tag name.
Auf diese Weise kannst du in einer Weise auf einen Commit oder Build verweisen, der für Andere leichter verständlich ist. Wenn du z.B. Git selbst aus dem Quellcode kompilierst, der sich im Git Projekt Repository befindet, dann gibt git --version einen ähnlichen Bezeichner zurück. Wenn du übrigens git describe auf einen Commit ausführst, den du direkt getagged hast, dann erhältst du statt dessen den Tag Namen.
The git describe command favors annotated tags (tags created with the -a or -s flag), so release tags should be created this way if you’re using git describe, to ensure the commit is named properly when described. You can also use this string as the target of a checkout or show command, although it relies on the abbreviated SHA-1 value at the end, so it may not be valid forever. For instance, the Linux kernel recently jumped from 8 to 10 characters to ensure SHA-1 object uniqueness, so older git describe output names were invalidated.
Der git describe Befehl funktioniert mit kommentierten Tags besser (d.h. Tags, die mit dem -a oder -s Flag erzeugt wurden), so daß es sich empfiehlt, Release Tags auf diese Weise anzulegen, wenn man git describe verwenden will. Du kannst diese Bezeichner auch als Parameter für andere Git Befehle, z.B. git checkout oder git show, wobei Git allerdings lediglich auf den abgekürzten SHA-1 Hash am Ende achtet, so daß er möglicherweise nicht ewig gültig ist. Das Linux Kernel Projekt beispielsweise erhöhte die Anzahl der Zeichen in abgekürzten Hashes kürzlich von 8 auf 10, um die Eindeutigkeit von SHA-1 Hashes sicherzustellen. Ältere git describe Ausgaben wurden damit ungültig.
Preparing a Release
Ein Release vorbereiten
Now you want to release a build. One of the things you’ll want to do is create an archive of the latest snapshot of your code for those poor souls who don’t use Git. The command to do this is git archive:
Du willst jetzt ein Release herausgeben. Dazu willst du u.a. ein Archiv mit dem letzten Snapshot deines Codes erzeugen, damit ihn auch arme Seelen herunterladen können, die Git nicht verwenden. Der folgende Befehl hilft dir dabei:
$ git archive master --prefix='project/' | gzip > `git describe master`.tar.gz
$ ls *.tar.gz
v1.6.2-rc1-20-g8c5b85c.tar.gz
If someone opens that tarball, they get the latest snapshot of your project under a project directory. You can also create a zip archive in much the same way, but by passing the --format=zip option to git archive:
Das erzeugt einen Tarball, der den aktuellen Snapshot in deinem Arbeitsverzeichnis enthält. Du kannst auf die gleiche Weise ein Zip Archiv erzeugen, indem du git archive die --format=zip Option übergibst.
$ git archive master --prefix='project/' --format=zip > `git describe master`.zipYou now have a nice tarball and a zip archive of your project release that you can upload to your website or e-mail to people.
Du hast jetzt sowohl einen Tarball als auch ein Zip Archiv deines Releases. Diese kannst du z.B. auf deiner Webseite publizieren oder auch per E-Mail verschicken.
The Shortlog
Das Shortlog
It’s time to e-mail your mailing list of people who want to know what’s happening in your project. A nice way of quickly getting a sort of changelog of what has been added to your project since your last release or e-mail is to use the git shortlog command. It summarizes all the commits in the range you give it; for example, the following gives you a summary of all the commits since your last release, if your last release was named v1.0.1:
Es wird Zeit, den Lesern der Mailingliste zu erklären, was es im Projekt Neues gibt. Der git shortlog Befehl ist eine Möglichkeit, schnell eine Art Changelog der Änderungen seit dem letzten Release auszugeben. Er faßt alle Commits in der angegebenen Zeitspanne zusammen. Der folgende Befehl z.B. erzeugt eine Zusammenfassung der Commits seit dem letzten Release, der als v1.0.1 getagged wurde:
$ git shortlog --no-merges master --not v1.0.1
Chris Wanstrath (8):
      Add support for annotated tags to Grit::Tag
      Add packed-refs annotated tag support.
      Add Grit::Commit#to_patch
      Update version and History.txt
      Remove stray `puts`
      Make ls_tree ignore nils

Tom Preston-Werner (4):
      fix dates in history
      dynamic version method
      Version bump to 1.0.2
      Regenerated gemspec for version 1.0.2
You get a clean summary of all the commits since v1.0.1, grouped by author, that you can e-mail to your list.
Du erhältst eine saubere Auflistung aller Commits seit v1.0.1, gruppiert nach Autor. Diese kannst du z.B. an die Mailingliste schicken oder irgendwie anders publizieren.